👣 Awesome python projects
🧐 A collection of super-cool Python projects for starters!! ✨


This project was a part of #Build with LetsUpgrade 2020 👣
OPEN SOURCE CONTEST - Build with LetsUpgrade 2020
About Build with LetsUpgrade 2020 💻
Build with LetsUpgrade is a 2 month-long program conducted by LetsUpgrade with aim to help beginners get started with Open Source Development. Students are paired with mentors, helping to gain exposure to real-world software development and techniques. The organizations are able to identify and bring in new developers and continue to contribute to open source after end also.
"The main mantra is to technically inspire all the beginners"
⭐ Check out the website of Build with Lets Upgrade 2020
👩 Project ID: 20
Project Manager: Garima Singh
Project Mentor: Mrinal Kumar, Garima Singh
✍ PROJECT DESCRIPTION
It basically has some ideas of awesome python projects which you can implement on a day-to-day basic.👩🔎 For example: it has a tic tac toe game using python. Some other projects namely Password manager, air quality detector and weather app are also implemented. You can add your own ideas and suggest some in the issues section. >## 📂 RELEVANT TECHNOLOGY ONLY PYTHON 👨💻
- Python
- Python GUI
- Tkinter Module
💻 GETTING STARTED
=> Fork  this repository to start contributing.
=> Open your Git Bash command window and in the root directory type the following commands :
    1) git init -initializes the git repository from the GitHub.
    2) git clone -Clone the repository to your local machine
      (git clone https://github.com/<your-github-username>/garimasingh128/awesome-python-projects)
📝 Learning Resources
Read these articles to get a quick grab on Python:
- https://www.python.org/about/gettingstarted/
- https://www.learnpython.org
- https://www.programiz.com/python-programming
Resources to learn Git:
- https://try.github.io/
References for Sentiment analyser ML project :
- https://www.youtube.com/watch?v=dyN_WtjdfpA
- https://www.geeksforgeeks.org/nlp-how-tokenizing-text-sentence-words-works/
- https://www.geeksforgeeks.org/pyplot-in-matplotlib/
References for pin your note :
- https://www.youtube.com/watch?v=ilI3H2O5KYg
- https://www.tutorialspoint.com/python/time_sleep.htm
- https://www.geeksforgeeks.org/python-gui-tkinter/
References for Notification app :
- https://www.youtube.com/watch?v=vPsM7qdnhzc
- https://www.geeksforgeeks.org/desktop-notifier-python/
- https://www.geeksforgeeks.org/python-desktop-notifier-using-plyer-module/
References for Contact Book Application :
- https://www.youtube.com/watch?v=0rzNAGe-gUs
- https://www.geeksforgeeks.org/python-tkinter-tutorial/
- https://www.geeksforgeeks.org/sql-using-python-sqlite-set-2/
References for Typing Speed Test :
- https://www.youtube.com/watch?v=0e6gmdYqXrc
- https://www.geeksforgeeks.org/python-string-split/
- https://www.geeksforgeeks.org/taking-input-in-python/
References for Secure your password:
- https://www.geeksforgeeks.org/taking-input-in-python/
- https://developers.google.com/edu/python/dict-files
- https://www.edureka.co/blog/print-in-python/
References for Tic Tac Toe:
- https://medium.com/byte-tales/the-classic-tic-tac-toe-game-in-python-3-1427c68b8874
- https://inventwithpython.com/chapter10.html
- https://www.geeksforgeeks.org/python-implementation-automatic-tic-tac-toe-game-using-random-number/
References for Password manager:
- https://www.geeksforgeeks.org/python-gui-tkinter/
- https://www.geeksforgeeks.org/generating-strong-password-using-python/
- https://www.geeksforgeeks.org/file-handling-python/
References for Weather application:
- https://www.youtube.com/watch?v=vJCjDevYDt8
- http://tomasz-kluczkowski.com/project/the-weather-app/
- https://www.geeksforgeeks.org/python-real-time-weather-detection-using-tkinter/
- https://github.com/Tomasz-Kluczkowski/Weather-App
References for Air quality detector:
- https://www.youtube.com/watch?v=vJCjDevYDt8
References for Iris Flower Detector:
- https://en.wikipedia.org/wiki/Iris_flower_data_set
- https://en.wikipedia.org/wiki/Support_vector_machine
- https://www.youtube.com/watch?v=Y17Y_8RK6pc
References for Flight Fare Prediction:
- https://www.kaggle.com/nikhilmittal/flight-fare-prediction-mh
- https://scikit-learn.org/stable/modules/generated/sklearn.linear_model. LinearRegression.html
- https://medium.com/code-to-express/flight-price-prediction-7c83616a13bb
References for Rock Paper Scissor:
- https://www.geeksforgeeks.org/python-program-implement-rock-paper-scissor-game
- https://www.afiniti.com/corporate/rock-paper-scissors
- https://www.tes.com/teaching-resource/building-a-rock-paper-scissors-game-using-scratch-11268599
- https://www.youtube.com/watch?v=KnVwmBh1bo0
References for Rolling Dice:
- https://www.geeksforgeeks.org/python-if-else/#if-elif
- https://www.geeksforgeeks.org/python-while-loops/?ref=lbp
- https://www.tutorialsteacher.com/python/random-module
References for Quiz Application:
- https://www.youtube.com/watch?v=VR-yNEpGk3g
- https://www.geeksforgeeks.org/python-multiple-choice-questions/
- https://www.youtube.com/watch?v=cwJBEZjQJtc
References for License Plate Detection :
- http://youtube.com/watch?v=GXyLSx8l9gM
- https://docs.opencv.org/master/d9/df8/tutorial_root.html
References for Alarm Clock :
- https://www.tutorialspoint.com/python/python_gui_programming.htm
- https://docs.python.org/3/library/datetime.html
References for Simple Calculator
- https://www.geeksforgeeks.org/make-simple-calculator-using-python/https://www.geeksforgeeks.org/make-simple-calculator-using-python/` https://www.youtube.com/watch?v=miC7ni64hbw
- https://www.youtube.com/watch?v=B1U0gUhUeQs
References for File Renaming Tool
- https://www.geeksforgeeks.org/rename-multiple-files-using-python/
- https://docs.python.org/3/
References for IRIS FLOWER CLASSIFICATION USING ML:
- https://medium.com/gft-engineering/start-to-learn-machine-learning-with-the-iris-flower-classification-challenge-4859a920e5e3
- https://www.neuraldesigner.com/learning/examples/iris-flowers-classification
- https://www.skyfilabs.com/project-ideas/iris-flower-classification-using-machine-learning
- https://analyticsindiamag.com/start-building-first-machine-learning-project-famous-dataset/
- https://www.youtube.com/watch?v=FLuqwQgSBDw&ab_channel=AppliedAICourse
- https://www.youtube.com/watch?v=CLvboTdwpjc&ab_channel=RealKnow
- https://youtu.be/Y17Y_8RK6pc?list=PL5tcWHG-UPH1OeZ2vU5xQd7RVpkWvwJny
- https://youtu.be/ACdBKML9l4s
Reference for Using Google API
- https://github.com/googleapis/google-api-python-client
- https://www.youtube.com/watch?v=IVjZMIWhz3Y
References for Admission Prediction using ML
- https://www.udemy.com/share/103wKGAEETdltURH8B/
References for IPL score predictor
- https://youtu.be/4CtyDxfhoN8
Refrences for Twitter Sentiment Analysis using ML
- https://towardsdatascience.com/social-media-sentiment-analysis-49b395771197
- https://towardsdatascience.com/social-media-sentiment-analysis-part-ii-bcacca5aaa39
Reference for Credit Card Fraud Detection
- https://www.geeksforgeeks.org/ml-credit-card-fraud-detection/
References for alarm clock
- https://youtube.com/playlist?list=PLu0W_9lII9ajLcqRcj4PoEihkukF_OTzA
- https://itsourcecode.com/free-projects/python-projects/alarm-clock-using-python-with-source-code/
💻 System Requirements
- Git
- Code Editor (Visual Studio Code, Sublime Text)
🏆 Contributing
Please read CONTRIBUTING.md for information on how to contribute to the project.
💼 Code of Conduct
We want to facilitate a healthy and constructive community behavior by adopting and enforcing our code of conduct.
Please adhere towards our code-of-conduct.md.
👬 Owner


❤️ Thanks to our awesome contributors.
👣 멋진 파이썬 프로젝트
🧐 초보자를 위한 아주 멋진 파이썬 프로젝트 모음!! ✨

이 프로젝트는 #Build with LetsUpgrade 2020의 일부였습니다 👣
오픈 소스 콘테스트 - Build with LetsUpgrade 2020
Build with LetsUpgrade 2020 정보 💻
Build with LetsUpgrade는 LetsUpgrade에서 진행하는 2개월 간의 프로그램으로, 초보자들이 오픈 소스 개발을 시작할 수 있도록 돕는 것을 목표로 합니다. 학생들은 멘토와 짝을 이루어 실제 소프트웨어 개발 및 기술에 대한 경험을 쌓을 수 있습니다. 조직은 새로운 개발자를 발굴하고 영입할 수 있으며, 프로그램 종료 후에도 오픈 소스에 계속 기여할 수 있습니다.
"주요 만트라는 모든 초보자에게 기술적으로 영감을 주는 것입니다"
⭐ Build with Lets Upgrade 2020 웹사이트 확인하기
👩 프로젝트 ID: 20
프로젝트 관리자: Garima Singh
프로젝트 멘토: Mrinal Kumar, Garima Singh
✍ 프로젝트 설명
기본적으로 일상 생활에서 구현할 수 있는 멋진 파이썬 프로젝트에 대한 몇 가지 아이디어가 있습니다.👩🔎 예를 들어, 파이썬을 사용한 틱택토 게임이 있습니다. 비밀번호 관리자, 대기 질 탐지기, 날씨 앱과 같은 다른 프로젝트도 구현되어 있습니다. 자신만의 아이디어를 추가하고 이슈 섹션에서 제안할 수 있습니다. >## 📂 관련 기술 오직 파이썬 👨💻
- 파이썬
- 파이썬 GUI
- Tkinter 모듈
💻 시작하기
=> 이 저장소를 포크하여 기여를 시작하세요.
=> Git Bash 명령 창을 열고 루트 디렉터리에서 다음 명령을 입력하세요.
    1) git init - 깃허브에서 git 저장소를 초기화합니다.
    2) git clone - 저장소를 로컬 머신으로 복제합니다.
      (git clone https://github.com/<your-github-username>/garimasingh128/awesome-python-projects)
📝 학습 자료
파이썬을 빠르게 파악하려면 다음 기사를 읽어보세요.
- https://www.python.org/about/gettingstarted/
- https://www.learnpython.org
- https://www.programiz.com/python-programming
Git을 배우기 위한 자료:
- https://try.github.io/
감성 분석기 ML 프로젝트 참고 자료:
- https://www.youtube.com/watch?v=dyN_WtjdfpA
- https://www.geeksforgeeks.org/nlp-how-tokenizing-text-sentence-words-works/
- https://www.geeksforgeeks.org/pyplot-in-matplotlib/
노트 고정 참고 자료:
- https://www.youtube.com/watch?v=ilI3H2O5KYg
- https://www.tutorialspoint.com/python/time_sleep.htm
- https://www.geeksforgeeks.org/python-gui-tkinter/
알림 앱 참고 자료:
- https://www.youtube.com/watch?v=vPsM7qdnhzc
- https://www.geeksforgeeks.org/desktop-notifier-python/
- https://www.geeksforgeeks.org/python-desktop-notifier-using-plyer-module/
연락처 책 애플리케이션 참고 자료:
- https://www.youtube.com/watch?v=0rzNAGe-gUs
- https://www.geeksforgeeks.org/python-tkinter-tutorial/
- https://www.geeksforgeeks.org/sql-using-python-sqlite-set-2/
타자 속도 테스트 참고 자료:
- https://www.youtube.com/watch?v=0e6gmdYqXrc
- https://www.geeksforgeeks.org/python-string-split/
- https://www.geeksforgeeks.org/taking-input-in-python/
비밀번호 보안 참고 자료:
- https://www.geeksforgeeks.org/taking-input-in-python/
- https://developers.google.com/edu/python/dict-files
- https://www.edureka.co/blog/print-in-python/
틱택토 참고 자료:
- https://medium.com/byte-tales/the-classic-tic-tac-toe-game-in-python-3-1427c68b8874
- https://inventwithpython.com/chapter10.html
- https://www.geeksforgeeks.org/python-implementation-automatic-tic-tac-toe-game-using-random-number/
비밀번호 관리자 참고 자료:
- https://www.geeksforgeeks.org/python-gui-tkinter/
- https://www.geeksforgeeks.org/generating-strong-password-using-python/
- https://www.geeksforgeeks.org/file-handling-python/
날씨 애플리케이션 참고 자료:
- https://www.youtube.com/watch?v=vJCjDevYDt8
- http://tomasz-kluczkowski.com/project/the-weather-app/
- https://www.geeksforgeeks.org/python-real-time-weather-detection-using-tkinter/
- https://github.com/Tomasz-Kluczkowski/Weather-App
대기 질 탐지기 참고 자료:
- https://www.youtube.com/watch?v=vJCjDevYDt8
붓꽃 탐지기 참고 자료:
- https://en.wikipedia.org/wiki/Iris_flower_data_set
- https://en.wikipedia.org/wiki/Support_vector_machine
- https://www.youtube.com/watch?v=Y17Y_8RK6pc
항공료 예측 참고 자료:
- https://www.kaggle.com/nikhilmittal/flight-fare-prediction-mh
- https://scikit-learn.org/stable/modules/generated/sklearn.linear_model. LinearRegression.html
- https://medium.com/code-to-express/flight-price-prediction-7c83616a13bb
가위바위보 참고 자료:
- https://www.geeksforgeeks.org/python-program-implement-rock-paper-scissor-game
- https://www.afiniti.com/corporate/rock-paper-scissors
- https://www.tes.com/teaching-resource/building-a-rock-paper-scissors-game-using-scratch-11268599
- https://www.youtube.com/watch?v=KnVwmBh1bo0
주사위 굴리기 참고 자료:
- https://www.geeksforgeeks.org/python-if-else/#if-elif
- https://www.geeksforgeeks.org/python-while-loops/?ref=lbp
- https://www.tutorialsteacher.com/python/random-module
퀴즈 애플리케이션 참고 자료:
- https://www.youtube.com/watch?v=VR-yNEpGk3g
- https://www.geeksforgeeks.org/python-multiple-choice-questions/
- https://www.youtube.com/watch?v=cwJBEZjQJtc
번호판 탐지 참고 자료:
- http://youtube.com/watch?v=GXyLSx8l9gM
- https://docs.opencv.org/master/d9/df8/tutorial_root.html
알람 시계 참고 자료:
- https://www.tutorialspoint.com/python/python_gui_programming.htm
- https://docs.python.org/3/library/datetime.html
간단한 계산기 참고 자료
- https://www.geeksforgeeks.org/make-simple-calculator-using-python/https://www.geeksforgeeks.org/make-simple-calculator-using-python/` https://www.youtube.com/watch?v=miC7ni64hbw
- https://www.youtube.com/watch?v=B1U0gUhUeQs
파일 이름 변경 도구 참고 자료
- https://www.geeksforgeeks.org/rename-multiple-files-using-python/
- https://docs.python.org/3/
붓꽃 분류 ML 참고 자료:
- https://medium.com/gft-engineering/start-to-learn-machine-learning-with-the-iris-flower-classification-challenge-4859a920e5e3
- https://www.neuraldesigner.com/learning/examples/iris-flowers-classification
- https://www.skyfilabs.com/project-ideas/iris-flower-classification-using-machine-learning
- https://analyticsindiamag.com/start-building-first-machine-learning-project-famous-dataset/
- https://www.youtube.com/watch?v=FLuqwQgSBDw&ab_channel=AppliedAICourse
- https://www.youtube.com/watch?v=CLvboTdwpjc&ab_channel=RealKnow
- https://youtu.be/Y17Y_8RK6pc?list=PL5tcWHG-UPH1OeZ2vU5xQd7RVpkWvwJny
- https://youtu.be/ACdBKML9l4s
구글 API 사용 참고 자료
- https://github.com/googleapis/google-api-python-client
- https://www.youtube.com/watch?v=IVjZMIWhz3Y
ML을 이용한 입학 예측 참고 자료
- https://www.udemy.com/share/103wKGAEETdltURH8B/
IPL 점수 예측기 참고 자료
- https://youtu.be/4CtyDxfhoN8
ML을 이용한 트위터 감성 분석 참고 자료
- https://towardsdatascience.com/social-media-sentiment-analysis-49b395771197
- https://towardsdatascience.com/social-media-sentiment-analysis-part-ii-bcacca5aaa39
신용카드 사기 탐지 참고 자료
- https://www.geeksforgeeks.org/ml-credit-card-fraud-detection/
알람 시계 참고 자료
- https://youtube.com/playlist?list=PLu0W_9lII9ajLcqRcj4PoEihkukF_OTzA
- https://itsourcecode.com/free-projects/python-projects/alarm-clock-using-python-with-source-code/
💻 시스템 요구 사항
- Git
- 코드 편집기 (Visual Studio Code, Sublime Text)
🏆 기여하기
프로젝트에 기여하는 방법에 대한 정보는 CONTRIBUTING.md를 읽어주세요.
💼 행동 강령
우리는 행동 강령을 채택하고 시행함으로써 건강하고 건설적인 커뮤니티 행동을 촉진하고자 합니다.
code-of-conduct.md를 준수해주세요.
👬 소유자
❤️ 멋진 기여자분들께 감사드립니다.
from tkinter import * from PIL import ImageTk, Image import requests import json
root=Tk() root.title("Air quality detector") #root.iconbitmap('c:/Users/Garima Singh/Desktop/image.png') root.geometry("800x40") root.configure(background='green')
try: api_request= requests.get("http://www.airnowapi.org/aq/observation/zipCode/current/?format=application/json&zipCode=20002&distance=10&API_KEY=1415D85E-FB89-40EF-B8F0-63F99A595BC8") api=json.loads(api_request.content) city=api[0]['ReportingArea'] quality=api[0]['AQI'] category=api[0]['Category']['Name'] except Exception as e: api="Error..."
myLabel= Label(root, text=city + " Air Quality" + str(quality) + " "+ category, font=("Helvetica", 20), background="green") myLabel.pack()
root.mainloop()
#https://www.youtube.com/watch?v=vJCjDevYDt8
Air Quality Detector (대기 질 탐지기)
이 프로젝트는 지정된 우편번호의 실시간 대기 질 지수(AQI)를 가져와서 간단한 GUI 창에 표시하는 응용 프로그램입니다.
주요 기능
requests라이브러리를 사용하여 AirNow API에서 대기 질 데이터를 가져옵니다.tkinter를 사용하여 사용자 인터페이스를 생성합니다.- 도시 이름, AQI 지수 및 대기 질 범주를 화면에 표시합니다.
코드 설명
먼저 필요한 라이브러리를 가져오고 Tkinter 루트 창을 설정합니다.
from tkinter import *
from PIL import ImageTk, Image
import requests
import json

root = Tk()
root.title("Air quality detector")
root.geometry("400x100") # 원본은 800x40이나 가독성을 위해 조정 가능
root.configure(background='green')
그 다음, API 요청을 보내고 JSON 데이터를 파싱합니다.
try:
    # AirNow API 호출
    api_request = requests.get("http://www.airnowapi.org/aq/observation/zipCode/current/?format=application/json&zipCode=20002&distance=10&API_KEY=1415D85E-FB89-40EF-B8F0-63F99A595BC8")
    api = json.loads(api_request.content)

    # 필요한 정보 추출
    city = api[0]['ReportingArea']
    quality = api[0]['AQI']
    category = api[0]['Category']['Name']
except Exception as e:
    api = "Error..."
마지막으로 레이블을 생성하여 정보를 표시하고 GUI 루프를 시작합니다.
myLabel = Label(root, text=city + " Air Quality: " + str(quality) + " " + category, font=("Helvetica", 14), background="green")
myLabel.pack(pady=20)

root.mainloop()
참고 자료
import tkinter as tk from tkinter import ttk from datetime import datetime import pygame
#Initializing our audio mixer and setting the wav alarm file we want it to play when the alarm goes off pygame.mixer.init(42050, -16, 2, 2048) alarm_sound = pygame.mixer.Sound("MyAlarm.wav") #Setting our initial global values start_printed = False stop_printed = True done = False finished = False stop_clicked = False
class AlarmApp(tk.Tk): def init(self): tk.Tk.init(self) #Title of the window set to 'Alarm Clock'
    self.title("Alarm Clock")
    #Make it so user can't resize page
    self.resizable(width = False, height = False)
    #Set up all of the drop-down lists
    self.hr = tk.IntVar(self)
    self.min = tk.IntVar(self)
    self.ampm = tk.StringVar(self)
    #Set the initial values of each drop-down list
    self.hr.set('12')
    self.min.set("00")
    self.ampm.set("AM")
    #Create the list of values from which we are choosing from in our drop-down list
    hours = []
    minutes = []
    ampmlist = ["AM","PM"]
    #Hours go from 1 to 12
    for x in range(1,13):
        hours.append(x)
    #Minutes go from 0 to 59
    for y in range(0,60):
        minutes.append("%02d" % (y,))
        #Placing all of our list into the respective drop-down list
    self.popmenuhours = tk.OptionMenu(self,self.hr, *hours)
    self.popmenuminutes = tk.OptionMenu(self,self.min, *minutes)
    self.popmenuAMPM = tk.OptionMenu(self, self.ampm, *ampmlist)
    #Placing our drop-down lists on the page as well as one label
    self.popmenuhours.pack(side = "left")
    self.thing = tk.Label(text = ":").pack(side = "left")
    self.popmenuminutes.pack(side = "left")
    self.popmenuAMPM.pack(side = "left")
    #Setting up all the buttons on the right hand side of the window. The text refers to what the button says
    #Command refers to which function it will run once it's clicked
    #State refers to whether it is clickable or not at the current state.
    self.alarmbutton = tk.Button(self, text="Set Alarm", command=self.start_clock)
    #I disabled both of these buttons since they should only be able to be pressed when it is appropriate and the alarm is running
    self.cancelbutton = tk.Button(self, text="Cancel Alarm", command=self.stop_clock, state = "disabled")
    self.stopalarmbutton = tk.Button(self, text = "Stop Alarm", command=self.stop_audio, state = "disabled")
    #Packing all the buttons into the page
    self.alarmbutton.pack()
    self.cancelbutton.pack()
    self.stopalarmbutton.pack()

def start_clock(self):

    global done, start_printed, stop_printed, stop_clicked
    #Done refers to whether either the time has been reached or if the user has cancelled. I.e: Loop is done.
    if done == False:
        #Cancel button is now active so user can decide at any point to cancel the alarm
        self.cancelbutton.config(state = "active")
        #Alarm button is now disabled since an alarm has currently already been set
        self.alarmbutton.config(state = "disabled")
        #On the first run of the loop, let the user know that an alarm has been set for their desired time
        if start_printed == False:
            #Print this notification for the user in the terminal
            print("Alarm set for {}:{}{}".format(self.hr.get(), "%02d" % (self.min.get()),self.ampm.get()))
            #Now set this to true, since we have printed it, so that it doesn't print it again on every loop for this set alarm
            start_printed = True
            #Stop printed set to false so that once the user cancels the timer, it will print a message (As we'll see later in the code)
            stop_printed = False
        #These next two if-statements are converting our hours from our drop-down list into 24-hour time, so that we can use it through DateTime
        if self.ampm.get() == "AM":
            if self.hr.get() in range(1,12):
                hour_value = self.hr.get()
            else:
                hour_value = self.hr.get() - 12
        if self.ampm.get() == "PM":
            if self.hr.get() in range(1,12):
                hour_value = self.hr.get() +12
            else:
                hour_value = self.hr.get()
        #Now we call the Alarm function with the information that the user has entered to check whether we have reached the alarm time
        self.Alarm("%02d" % (hour_value,), "%02d" % (self.min.get()))
    #If user has clicked the cancel alarm button, we reset everything
    if stop_clicked == True:
        done = False
        start_printed = False
        stop_clicked = False

def stop_clock(self):
    global done, stop_clicked
    #Let the user know that the alarm has been cancelled by printing it in the terminal
    print("Alarm set for {}:{}{} has been cancelled".format(self.hr.get(), "%02d" % (self.min.get()),self.ampm.get()))
    #Cancel button has now been clicked
    stop_clicked = True
    #Now done with the current alarm/loop
    done = True
    #Buttons reset to what they were originally
    self.cancelbutton.config(state = "disabled")
    self.alarmbutton.config(state = "active")

def stop_audio(self):
    #Use PyGame to stop the audio since button has been clicked
    pygame.mixer.Sound.stop(alarm_sound)
    #Stop alarm button disabled and alarm button active, essentially reseting everything
    self.stopalarmbutton.config(state = "disabled")
    self.alarmbutton.config(state = "active")


def Alarm(self,myhour,myminute):
    global done, start_printed, finished
    #If we are still not done, we follow this statement
    if done == False:
        #We convert the information into strings (To match DateTime)
        myhour,myminute = str(myhour),str(myminute)
        #Next, we extract the data of the current time from DateTime and take the information we want (hour and minute)
        a = str(datetime.now())
        b = a.split(" ")[1].split(":")
        hour = b[0]
        minute = b[1]
        #Now, if the alarm time matches the current time, we follow his statement. Alarm is going to go off!
        if hour == myhour and minute == myminute:
            #Using pygame to play audio, loops = -1 refers to an infinite loop
            pygame.mixer.Sound.play(alarm_sound, loops = -1)
            print("Alarm is ringing!")
            #We are now done
            done = True
            #Also finished
            finished = True
            #Now we change back the state of the cancel button to disabled, and the state of the alarm stop to active
            #This is so the user can stop the alarm, since it will infinitely loop
            self.cancelbutton.config(state = "disabled")
            self.stopalarmbutton.config(state = "active")

        else:
            #If it is still not the set time, we recursively loop back to the start_clock function
            self.after(1000, self.start_clock)
        done = False
    #If we are finished, which we are when the alarm goes off, we reset everything
    if finished == True:
        start_printed = False
        finished = False
app = AlarmApp() app.mainloop()
Alarm Clock (알람 시계)
이 프로젝트는 tkinter를 사용하여 GUI 기반의 알람 시계를 구현한 것입니다. 사용자가 원하는 시간을 설정하면 해당 시간에 pygame을 사용하여 알람 소리를 재생합니다.
주요 기능
tkinter를 사용하여 시간(시/분/AM/PM)을 선택할 수 있는 드롭다운 메뉴를 제공합니다.pygame.mixer를 사용하여 알람 소리(MyAlarm.wav)를 재생하고 제어합니다.datetime라이브러리를 사용하여 현재 시간을 실시간으로 확인합니다.- 알람 설정, 취소, 및 소리 중지 기능을 완벽하게 지원합니다.
코드 설명
1. 초기화 및 사운드 설정
pygame의 오디오 믹서를 초기화하고 재생할 알람 파일을 로드합니다.
import pygame
from datetime import datetime
import tkinter as tk

# 오디오 믹서 초기화 및 알람 소리 로드
pygame.mixer.init(42050, -16, 2, 2048)
alarm_sound = pygame.mixer.Sound("MyAlarm.wav")
2. GUI 구성
OptionMenu를 사용하여 사용자가 시, 분, AM/PM을 선택할 수 있는 인터페이스를 만듭니다.
class AlarmApp(tk.Tk):
    def __init__(self):
        tk.Tk.__init__(self)
        self.title("Alarm Clock")

        # 시/분/AM/PM 변수 초기화
        self.hr = tk.IntVar(self)
        self.min = tk.IntVar(self)
        self.ampm = tk.StringVar(self)

        # 드롭다운 메뉴 배치
        self.popmenuhours = tk.OptionMenu(self, self.hr, *range(1, 13))
        self.popmenuminutes = tk.OptionMenu(self, self.min, *["%02d" % i for i in range(60)])
        self.popmenuAMPM = tk.OptionMenu(self, self.ampm, "AM", "PM")

        self.popmenuhours.pack(side="left")
        self.popmenuminutes.pack(side="left")
        self.popmenuAMPM.pack(side="left")

        # 버튼들
        self.alarmbutton = tk.Button(self, text="Set Alarm", command=self.start_clock)
        self.alarmbutton.pack()
3. 알람 로직
after 메서드를 사용하여 1초마다 현재 시간을 확인하고, 설정된 시간과 일치하는지 체크합니다.
    def Alarm(self, myhour, myminute):
        if not done:
            now = datetime.now()
            current_hour = now.strftime("%H")
            current_minute = now.strftime("%M")

            if current_hour == myhour and current_minute == myminute:
                # 알람 소리 무한 반복 재생
                pygame.mixer.Sound.play(alarm_sound, loops=-1)
                print("Alarm is ringing!")
            else:
                # 1초 후에 다시 확인
                self.after(1000, self.start_clock)
사용 방법
- 드롭다운 메뉴에서 원하는 알람 시간을 선택합니다.
- 'Set Alarm' 버튼을 클릭하여 알람을 설정합니다.
- 알람이 울리면 'Stop Alarm' 버튼을 눌러 소리를 끕니다.
참고 자료
Admission Prediction using ML
Admission Prediction using ML (머신러닝을 이용한 입학 예측)
이 프로젝트는 학생들의 GRE 성적, TOEFL 성적, 대학 평점(CGPA) 등을 기반으로 대학 입학 확률을 예측하는 머신러닝 모델을 구축한 것입니다.
주요 기능
- 데이터 분석 및 시각화:
seaborn및matplotlib을 사용하여 데이터 간의 상관관계를 탐색합니다. - 데이터 전처리: 불필요한 열(Serial No.)을 삭제하고 데이터를 학습에 적합하게 정리합니다.
- 선형 회귀(Linear Regression):
sklearn의 선형 회귀 모델을 사용하여 성적과 입학 확률 간의 관계를 모델링합니다. - 성능 평가: 예측값과 실제값을 비교하여 모델의 정확도를 평가합니다.
코드 설명
1. 데이터 로드 및 확인
pandas 라이브러리를 사용하여 CSV 데이터를 읽어오고 상위 행을 확인합니다.
import pandas as pd
import seaborn as sns
import matplotlib.pyplot as plt

# 데이터 로드
df = pd.read_csv("Admission_Predict_Ver1.1.csv")
print(df.head(8))
2. 데이터 탐색 (EDA)
상관관계 행렬과 히트맵을 통해 어떤 성적이 입학 확률에 가장 큰 영향을 미치는지 확인합니다.
# 상관관계 히트맵 시각화
sns.heatmap(df.corr(), annot=True)
plt.show()

# CGPA 분포 시각화
sns.distplot(df.CGPA)
plt.show()
3. 모델 구축 및 학습
입학 확률에 영향이 큰 요소들을 독립 변수(X)로 설정하고, 선형 회귀 모델을 학습시킵니다.
from sklearn.linear_model import LinearRegression
from sklearn.model_selection import train_test_split

# 특징값(X)과 타겟값(y) 설정
x = df[['GRE Score', 'TOEFL Score', 'CGPA']]
y = df[['Chance of Admit ']]

# 데이터셋 분리 (학습용 80%, 테스트용 20%)
x_train, x_test, y_train, y_test = train_test_split(x, y, test_size=0.20, random_state=0)

# 선형 회귀 모델 생성 및 학습
linreg = LinearRegression()
linreg.fit(x_train, y_train)
4. 결과 평가
평균 절대 오차(MAE)를 계산하여 모델의 성능을 확인합니다.
from sklearn import metrics
y_pred = linreg.predict(x_test)
print(metrics.mean_absolute_error(y_test, y_pred)) # MAE 출력
참고 자료
Automatic FB login
Automatic FB Login (자동 페이스북 로그인)
이 프로젝트는 selenium 브라우저 자동화 라이브러리를 사용하여 페이스북에 자동으로 로그인하는 스크립트입니다.
주요 기능
- 사용자로부터 아이디(이메일)와 비밀번호를 입력받습니다.
webdriver.Chrome을 사용하여 크롬 브라우저를 제어합니다.- 페이스북 로그인 페이지의 요소(이메일함, 비밀번호함, 로그인 버튼)를 찾아 자동으로 데이터를 입력하고 클릭합니다.
코드 설명
1. 입력 및 설정
사용자로부터 계정 정보를 입력받고 크롬 드라이버의 위치를 설정합니다.
from selenium import webdriver
from selenium.webdriver.common.keys import Keys

# 사용자 정보 입력
user_id = input('페이스북 계정 아이디를 입력하세요: ')
password = input('비밀번호를 입력하세요: ')

# 크롬 드라이버 경로 설정
cd = 'C:\\webdrivers\\chromedriver.exe'
browser = webdriver.Chrome(cd)
2. 페이지 접속 및 로그인 수행
browser.get으로 페이스북에 접속한 후, HTML 요소의 ID를 사용하여 로그인 폼을 제어합니다.
browser.get('https://www.facebook.com/')

# 이메일 입력창 찾기 및 입력
user_box = browser.find_element_by_id("email")
user_box.send_keys(user_id)

# 비밀번호 입력창 찾기 및 입력
password_box = browser.find_element_by_id("pass")
password_box.send_keys(password)

# 로그인 버튼 찾기 및 클릭
login_box = browser.find_element_by_id("u_0_b")
login_box.click()
주의 사항
chromedriver의 버전이 현재 설치된 크롬 브라우저의 버전과 일치해야 합니다.- 페이스북의 로그인 버튼 ID(
u_0_b)는 시간이 지남에 따라 변경될 수 있으므로, 실제 작동하지 않을 경우 브라우저 개발자 도구(F12)로 현재 ID를 확인해야 합니다. - 자동화된 접근은 서비스의 약관에 위배될 수 있으므로 주의하여야 합니다.
참고 자료
Breast Cancer Detection using Neural Network
Breast Cancer Detection (유방암 검출)
이 프로젝트는 텐서플로우(TensorFlow)와 케라스(Keras)를 사용하여 유방암 데이터를 분류하는 인공 신경망 모델을 구축하는 예제입니다. 1D CNN(Convolutional Neural Network) 구조를 사용하여 악성(Malignant)과 양성(Benign) 종양을 구별합니다.
주요 기능
- 데이터셋: Scikit-learn에서 제공하는 위스콘신 유방암 데이터셋을 사용합니다.
- 모델 구조:
Conv1D,Dropout,Flatten,Dense레이어를 결합하여 구축합니다. - 성능 최적화:
StandardScaler를 통한 데이터 정규화와Dropout을 통한 과적합 방지를 수행합니다.
코드 설명
1. 라이브러리 및 데이터 준비
텐서플로우와 데이터 처리를 위한 판다스, 넘파이를 가져옵니다.
import tensorflow as tf
from tensorflow.keras import Sequential
from tensorflow.keras.layers import Dropout, Conv1D, Dense, Flatten
from sklearn import datasets
from sklearn.model_selection import train_test_split
from sklearn.preprocessing import StandardScaler

# 데이터셋 로드
cancer = datasets.load_breast_cancer()
X = pd.DataFrame(data=cancer.data, columns=cancer.feature_names)
y = cancer.target
2. 전처리
학습 성능을 높이기 위해 데이터를 표준화(Standardization)하고, CNN 입력 형식에 맞게 리셰이프(Reshape)합니다.
scaler = StandardScaler()
X_train = scaler.fit_transform(X_train)
X_test = scaler.transform(X_test)

# 3D 텐서로 변환 (샘플 수, 특징 수, 채널 수)
X_train = X_train.reshape(455, 30, 1)
X_test = X_test.reshape(114, 30, 1)
3. CNN 모델 구축
1차원 합성곱 레이어를 사용하여 특징을 추출하고, 마지막 레이어에서 시그모이드(Sigmoid) 활성화 함수를 통해 확률 값을 출력합니다.
model = Sequential()
model.add(Conv1D(filters=32, kernel_size=2, activation='relu', input_shape=(30, 1)))
model.add(Dropout(0.2))
model.add(Conv1D(filters=64, kernel_size=2, activation='relu'))
model.add(Dropout(0.5))
model.add(Flatten())
model.add(Dense(64, activation='relu'))
model.add(Dense(1, activation='sigmoid'))

model.compile(optimizer='adam', loss='binary_crossentropy', metrics=['accuracy'])
참고 자료
CALCULATOR_PYTHON
Simple Calculator (간단한 계산기)
이 프로젝트는 tkinter를 사용하여 사칙연산뿐만 아니라 삼각함수, 로그, 지수 연산 등이 가능한 공학용 계산기를 구현한 것입니다.
주요 기능
- 기본 연산: 덧셈, 뺄셈, 곱셈, 나눗셈, 나머지 연산(%)
- 고급 연산: 로그(log10, ln), 삼각함수(sin, cos, tan), 제곱근(Sqrt), 팩토리얼(x!), 역수(1/x), 거듭제곱(^)
- 상수: 원주율(pi), 자연상수(e)
- 기타: Degrees 변환, 괄호 사용 가능, 초기화(C), 한 글자 삭제(DEL)
코드 설명
1. GUI 설정 및 입력창
tkinter를 사용하여 검은색 배경에 흰색 글씨의 입력창을 생성합니다.
from tkinter import *
import math as m

root = Tk()
root.title("Simple Calculator")

# 결과창 설정
e = Entry(root, width=50, borderwidth=5, relief=RIDGE, fg="White", bg="Black")
e.grid(row=0, column=0, columnspan=5, padx=10, pady=15)
2. 과학적 계산 기능을 담당하는 함수
math 라이브러리를 사용하여 복잡한 계산을 수행합니다. bind를 통해 버튼 클릭 이벤트를 처리합니다.
def sc(event):
    key = event.widget
    text = key['text']
    no = e.get()
    result = ''

    if text == 'sin':
        result = str(m.sin(float(no)))
    elif text == 'cos':
        result = str(m.cos(float(no)))
    # ... (기타 함수들)

    e.delete(0, END)
    e.insert(0, result)
3. 수식 계산 함수
입력창 전역의 수식을 eval() 함수를 사용하여 한꺼번에 계산합니다.
def evaluate():
    ans = e.get()
    try:
        ans = eval(ans)
        e.delete(0, END)
        e.insert(0, ans)
    except:
        e.delete(0, END)
        e.insert(0, "Error")
사용 방법
- 숫 버튼과 연산자 버튼을 눌러 수식을 완성합니다.
=버튼을 누르면 전체 수식이 계산됩니다.sin,log등의 과학적 함수는 숫자를 먼저 입력한 후 해당 버튼을 누르면 즉시 계산됩니다.
참고 자료
CONTACT_BOOK_APPLICATION
Contact Book Application (연락처 관리 애플리케이션)
이 프로젝트는 Tkinter와 Sqlite3를 사용하여 연락처 정보를 데이터베이스에 저장하고 관리(생성, 조회, 수정, 삭제)하는 GUI 애플리케이션입니다.
주요 기능
- 데이터베이스 연동:
sqlite3를 사용하여 로컬 파일(mysq.db)에 연락처를 영구 저장합니다. - GUI 인터페이스:
Tkinter를 통해 이름과 전화번호를 입력받고 버튼으로 명령을 실행합니다. - CRUD 작업:
- Submit: 연락처 추가
- Show: 전체 연락처 터미널 출력
- Update: 전화번호를 기준으로 이름 변경
- Delete: 이름 기준으로 연락처 삭제
- Drop table: 테이블 전체 삭제
코드 설명
1. 데이터베이스 초기화
프로그램 실행 시 people 테이블이 없으면 자동으로 생성합니다.
import sqlite3

db = sqlite3.connect('mysq.db')
cursor = db.cursor()
cursor.execute("CREATE TABLE IF NOT EXISTS people(name TEXT, phone TEXT)")
db.commit()
2. 연락처 추가 (Insert)
사용자가 입력한 이름과 전화번호를 DB에 저장합니다.
def insert():
    name1 = textin.get()
    phone1 = textinn.get()
    conn = sqlite3.connect('mysq.db')
    with conn:
        cursor = conn.cursor()
        cursor.execute('INSERT INTO people(name, phone) VALUES(?,?)', (name1, phone1))
    # conn.commit()은 with 문에 의해 자동 처리됩니다.
3. 연락처 수정 및 삭제 (Update & Delete)
특정 조건을 만족하는 레코드를 수정하거나 삭제하는 SQL 쿼리를 실행합니다.
def updateContact():
    nam = name.get()
    ph = phone.get()
    connnt = sqlite3.connect('mysq.db')
    cursor = connnt.cursor()
    cursor.execute("UPDATE people SET name = ? WHERE phone = ?", (nam, ph))
    connnt.commit()

def det():
    dee = dell.get()
    connnt = sqlite3.connect('mysq.db')
    cursor = connnt.cursor()
    cursor.execute("DELETE FROM people WHERE name = ?", (dee,))
    connnt.commit()
사용 방법
- 'Name'과 'Phone' 칸에 정보를 입력하고 'Submit'을 누릅니다.
- 'Show'를 누르면 콘솔(터미널)에 현재 저장된 목록이 출력됩니다.
- 수정이 필요하면 'Update Name'과 'Provide Phone No.'를 입력하고 'Update'를 누릅니다.
참고 자료
Contact-Manager-App-Django
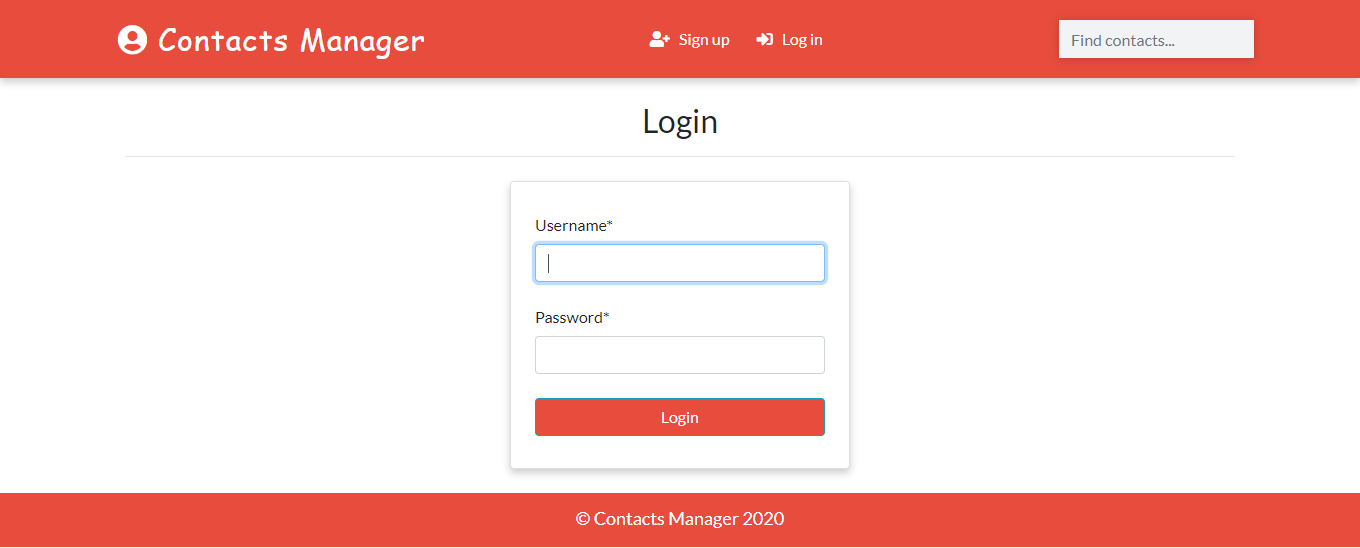
Functionalities
- User Authentication
- Search
- Real Time Update from Admin
- Delete
- Filter according to gender
- Profile Image
How To Run
git clone https://github.com/saadhaxxan/Contact-Manager-Django.git
cd Contact-Manager-Django
python manage.py runserver
Access to the Admin Panel
python manage.py createsuperuser
Author
You can get in touch with me on my LinkedIn Profile:
Saad Hassan
![]()
You can also follow my GitHub Profile to stay updated about my latest projects: ![]()
Contact Manager App with Django (장고 기반 연락처 관리 앱)
이 프로젝트는 파이썬의 대표적인 웹 프레임워크인 Django를 사용하여 웹 기반으로 연락처를 관리하는 애플리케이션입니다. 사용자 인증, 검색, 성별 필터링 등 실무적인 웹 서비스 기능을 포함하고 있습니다.
주요 기능
- 사용자 인증: 회원가입, 로그인 기능을 통해 개인별 연락처 목록을 관리합니다.
- 연락처 검색: 이름이나 번호로 저장된 연락처를 빠르게 찾을 수 있습니다.
- 실시간 관리자 업데이트: 장고의 Admin 패널을 통해 데이터를 실시간으로 관리할 수 있습니다.
- 성별 필터링: 등록된 연락처를 성별에 따라 나누어 볼 수 있습니다.
- 프로필 이미지: 연락처마다 사진을 업로드하고 관리할 수 있습니다.
코드 및 프로젝트 구조 설명
1. 모델 설정 (models.py)
연락처 정보를 저장하기 위한 데이터 구조를 정의합니다. 이름, 전화번호, 이메일, 성별, 프로필 이미지 등을 포함합니다.
from django.db import models

class Contact(models.Model):
    name = models.CharField(max_length=20)
    email = models.EmailField(max_length=100)
    phone = models.CharField(max_length=15)
    gender = models.CharField(max_length=10, choices=(('Male', 'Male'), ('Female', 'Female')))
    image = models.ImageField(upload_to='images/', blank=True)
    # ...
2. 검색 및 필터링 기능
Django ORM의 filter 기능을 사용하여 검색어와 성별에 맞는 데이터를 추출합니다.
def search(request):
    if request.method == 'POST':
        search_str = request.POST.get('search')
        contacts = Contact.objects.filter(name__icontains=search_str)
        return render(request, 'index.html', {'contacts': contacts})
실행 방법
- 저장소를 클론하고 해당 폴더로 이동합니다.
pip install -r requirements.txt로 필요한 패키지를 설치합니다.- 데이터베이스 정보를 생성합니다:
python manage.py migrate - 서버를 실행합니다:
python manage.py runserver - 웹 브라우저에서
127.0.0.1:8000에 접속합니다.
참고 자료
CREDITCARD_FRAUD_PREDICTION_PROJECT
Credit Card Fraud Prediction (신용카드 부정 사용 예측)
이 프로젝트는 신용카드 결제 데이터를 분석하여 해당 거래가 정상인지, 아니면 부정 사용(Fraud)인지 감지하는 머신러닝 모델을 구축하는 예제입니다. 데이터의 불균형(정상 거래가 압도적으로 많음)을 처리하기 위해 Isolation Forest와 같은 이상 탐지 알고리즘을 사용합니다.
주요 기능
- 이상 탐지(Anomaly Detection):
Isolation Forest알고리즘을 사용하여 평소와 다른 패턴의 거래를 찾아냅니다. - 데이터 시각화: 상관관계 히트맵을 통해 다양한 특징(Features) 간의 관계를 분석합니다.
- 성능 평가: 부정 사용 탐지 모델의 정확도와 정밀도를 평가합니다.
코드 설명
1. 데이터 로드 및 확인
약 28만 건의 거래 데이터가 포함된 creditcard.csv 파일을 읽어옵니다. 이 데이터는 보안상 실제 특징 대신 V1~V28로 이름 붙여진 PCA 변환 데이터로 구성되어 있습니다.
import pandas as pd
import numpy as np
import seaborn as sns
import matplotlib.pyplot as plt

data = pd.read_csv('creditcard.csv')
print(data.shape) # (284807, 31)
2. 데이터 탐색 및 상관관계 분석
히트맵을 사용하여 결제 금액(Amount)이나 시간(Time)이 부정 사용(Class)과 어떤 연관이 있는지 분석합니다.
corr_matrix = data.corr()
plt.figure(figsize=(30, 30))
sns.heatmap(corr_matrix, annot=True, cmap="RdYlGn")
plt.show()
3. Isolation Forest 모델 학습
이 알고리즘은 정상 데이터와 다른 '고립된' 데이터를 이상치로 판단합니다.
from sklearn.ensemble import IsolationForest

# 모델 생성 (예상 오차율 0.01 설정 예시)
clf = IsolationForest(max_samples=len(X), contamination=0.01, random_state=42)
clf.fit(X)

# 예측 수행 (1: 정상, -1: 이상치)
y_pred = clf.predict(X)
참고 자료
FILE PARSER
Powered By: 
A lot of time we need to rename the files in our directory according to certain conventions. For example, File001.jpg, File002.jpg, File003.jpg, and this goes on. Doing this task manually can be repetitive and boring. To avoid this manual work, you can create a tool to rename a large number of files.

FILE PARSER is a python-powered, user-friendly, file-renaming tool.
- RUN main.py
- TYPE Source Directory
- Magic
And of course FILE PARSER itself is open source with a public repository on GitHub.
Installation
File-Parser requires Python v3.x to run.
Install the dependencies and follow the steps:
$ git clone https://github.com/ViAsmit/File-Parser.git
$ cd File-Parser
$ chmod +x main.py
$ ./main.py < SOURCE DIRECTORY HERE >
TYPE FILE PREFIX YOU WANT TO USE.
DONE!!!
File Rename Tool (파일 이름 변경 도구)
이 프로젝트는 지정된 디렉토리 내의 모든 파일 이름을 일정한 규칙(접두사 + 일련번호)에 맞게 일괄적으로 변경해 주는 간단하면서도 강력한 파이썬 스크립트입니다. 많은 양의 이미지나 데이터를 정리할 때 유용합니다.
주요 기능
- 일괄 변경: 수많은 파일의 이름을 한 번에 변경합니다.
- 접두사(Prefix) 설정: 사용자가 원하는 단어를 접두사로 설정할 수 있습니다.
- 확장자 유지: 파일의 원래 확장자를 자동으로 인식하여 유지합니다.
- 일련번호 부여: 파일마다 1부터 시작하는 번호를 자동으로 붙여줍니다.
코드 설명
1. 사용자 입력 및 파일 순회
파일 이름 앞에 붙일 접두사를 입력받고, sys.argv[1]로 전달된 경로 안의 파일들을 하나씩 처리합니다.
import os
import sys

# 접두사 입력 (예: photo -> photo-1.jpg, photo-2.jpg ...)
prefix = input("Enter the Prefix- you want to use... \n")

# 지정된 경로의 파일 목록을 순회
for count, file in enumerate(os.listdir(sys.argv[1])):
    # ...
2. 확장 추출 및 새 이름 생성
파일 이름에서 확장자를 분리하고, 새로운 이름 규칙을 적용합니다.
    # 확장자 분리
    extnsn = file.split('.')[-1]

    # 새 파일 이름 생성 (접두사-번호.확장자)
    new_file = f"{prefix}-{count+1}.{extnsn}"
3. 실제 이름 변경 실행
os.rename 함수를 사용하여 원본 경로(src)에서 대상 경로(dst)로 이름을 변경합니다.
    src = sys.argv[1] + file
    dst = sys.argv[1] + new_file
    os.rename(src, dst)
사용 방법
터미널에서 다음과 같이 실행합니다:
python main.py /path/to/your/files/
(폴더 경로 끝에 /를 포함해야 정확히 작동합니다.)
참고 자료
Fligth-Fare-Prediction
Flight Fare Prediction (항공권 가격 예측)
이 프로젝트는 항공사, 여행 날짜, 출발지, 목적지 등 다양한 요인을 분석하여 항공권의 가격을 예측하는 머신러닝 모델을 구축하는 예제입니다. 데이터 전처리, 특징 공학(Feature Engineering), 시각화 과정을 상세히 포함하고 있습니다.
주요 기능
- 데이터 정제: 결측치(Null values)를 제거하고 불필요한 정보를 필터링합니다.
- 특징 공학: 여행 날짜에서 일/월 정보를 추출하고, 범주형 데이터를 수치 데이터로 변환(Label Encoding)합니다.
- 데이터 분석 및 시각화: 항공사별 가격 분포, 소요 시간과 가격의 관계 등을 분석합니다.
코드 설명
1. 데이터 로드 및 결측치 처리
pandas를 사용하여 엑셀 데이터를 로드하고, 학습에 방해가 되는 결측치를 제거합니다.
import pandas as pd

# 데이터 로드
df = pd.read_excel("data/data_train.xlsx")

# 결측치 확인 및 제거
df.dropna(inplace=True)
2. 범주형 데이터 인코딩
머신러닝 알고리즘이 처리할 수 있도록 항공사(Airline), 출발지(Source) 등 텍스트 데이터를 숫자로 변환합니다.
from sklearn.preprocessing import LabelEncoder

encoder = LabelEncoder()
df['Airline'] = encoder.fit_transform(df['Airline'])
df['Source'] = encoder.fit_transform(df['Source'])
df['Destination'] = encoder.fit_transform(df['Destination'])
3. 소요 시간 처리
2h 50m과 같은 문자열 형식의 소요 시간을 머신러닝 모델이 이해할 수 있는 형식으로 변환하거나 특징을 추출합니다.
# 요일, 시간 등의 특징을 추출하는 과정이 Notebook에 포함되어 있습니다.
참고 자료
Facebook Birthday Bot
Facebook Birthday Bot (페이스북 생일 축하 봇)
이 프로젝트는 Selenium을 사용하여 페이스북 친구들의 생일을 자동으로 확인하고 축하 메시지를 남겨주는 자동화 스크립트입니다.
주요 기능
- 자동 로그인: 사용자의 ID와 비밀번호를 입력받아 페이스북에 자동으로 로그인합니다.
- 생일 확인: 오늘 생일인 친구가 몇 명인지 확인합니다.
- 축하 메시지 자동 전송: 친구의 타임라인에 "Happy Birthday" 메시지를 자동으로 작성하고 게시합니다.
코드 설명
1. 웹드라이버 설정 및 로그인
webdriver를 사용하여 브라우저를 제어하고, 이메일과 비밀번호 입력란을 찾아 정보를 입력한 뒤 로그인 버튼을 누릅니다.
from selenium import webdriver

# 크롬 드라이버 경로 설정
cd = 'C:\\webdrivers\\chromedriver.exe'
browser = webdriver.Chrome(cd)
browser.get('https://www.facebook.com/')

# 로그인 정보 입력
user_box = browser.find_element_by_id("email")
user_box.send_keys(user_id)
password_box = browser.find_element_by_id("pass")
password_box.send_keys(password)

# 로그인 버튼 클릭
login_box = browser.find_element_by_id("u_0_b")
login_box.click()
2. 생일 이벤트 페이지 이동 및 메시지 전송
생일인 친구 목록 페이지로 이동하여 메시지 입력창(xpath 이용)을 찾고, 루프를 돌며 축하 글을 작성합니다.
# 생일 페이지로 이동
browser.get('https://www.facebook.com/events/birthdays/')

# 메시지 입력창 목록 가져오기
bday_list = browser.find_elements_by_xpath("//*[@class ='...']")

for element in bday_list:
    element.send_keys("Happy Birthday, Best wishes.")
    element.send_keys(Keys.RETURN)
사용 방법
- Python과
selenium라이브러리를 설치합니다. - 시스템 환경에 맞는
chromedriver를 다운로드하고 소스 코드 내 경로를 수정합니다. - 스크립트를 실행하고 터미널에 페이스북 계정 정보를 입력합니다.
참고 자료
USING GOOGLE API FOR EDUCATION PURPOSE ONLE OPEN GEOLOAD.PY THEN GEODUMP.PY THEN WHERE.HTML
Google Geocoding API 활용 지리 데이터 분석
이 프로젝트는 Google Geocoding API를 사용하여 주소 데이터를 위도와 경도로 변환하고, 이를 데이터베이스에 저장한 후 지도상에 시각화하는 과정을 다룹니다.
주요 기능
- 지오코딩(Geocoding): 텍스트 주소를 지리적 좌표로 변환합니다.
- 데이터 캐싱: 지오코딩 결과를
SQLite3데이터베이스에 저장하여 불필요한 API 호출을 방지합니다. - 시각화: 수집된 데이터를 바탕으로 HTML/JS 기반의 지도 위에 위치를 표시합니다.
코드 설명
1. 데이터 로드 및 API 호출 (geoload.py)
where.data 파일에 저장된 주소들을 한 줄씩 읽어 Google API로 정보를 요청합니다. 받아온 JSON 데이터는 Locations 테이블에 저장됩니다.
import sqlite3
import urllib.request, urllib.parse

# 데이터베이스 연결
conn = sqlite3.connect('geodata.sqlite')
cur = conn.cursor()

# API 서비스 주소 (Google API 또는 연습용 프록시)
serviceurl = "http://py4e-data.dr-chuck.net/json?"

# 주소 데이터를 URL 인코딩하여 요청
url = serviceurl + urllib.parse.urlencode({"address": address})
uh = urllib.request.urlopen(url, context=ctx)
data = uh.read().decode()
2. 데이터 베이스 저장
이미 처리된 주소는 데이터베이스에서 조회하여 넘어가고, 새로운 주소만 API를 호출함으로써 효율적으로 관리합니다.
cur.execute('''INSERT INTO Locations (address, geodata) VALUES ( ?, ? )''',
            (memoryview(address.encode()), memoryview(data.encode())))
conn.commit()
3. 결과 확인 (geodump.py 및 where.html)
저장된 데이터를 읽어 JS 파일(where.js)을 생성하고, 브라우저에서 where.html을 열어 지도상에 표시된 위치를 확인할 수 있습니다.
참고 자료
HANGMAN_GAME
Hangman Game (행맨 게임)
이 프로젝트는 파이썬의 random 모듈을 사용하여 구현한 고전적인 단어 맞추기 게임인 '행맨(Hangman)'입니다. 컴퓨터가 영화 제목 목록 중 하나를 무작위로 선택하면, 사용자는 알파벳을 하나씩 입력하여 단어를 완성해야 합니다.
주요 기능
- 무작위 단어 선택: 여러 영화 제목이 포함된 리스트에서
random.choice()를 통해 단어를 선택합니다. - 게임 로직: 사용자가 입력한 알파벳이 단어에 포함되어 있는지 확인하고, 일치하는 위치에 표시합니다.
- 기회 제한: 총 10번의 기회가 주어지며, 틀릴 때마다 기회가 차감됩니다.
- 반복 플레이: 게임이 끝난 후 다시 플레이할지 여부를 선택할 수 있습니다.
코드 설명
1. 단어 선택 및 초기 설정
게임에 사용될 단어 리스트를 정의하고, 그중 하나를 무작위로 골라 대문자로 변환합니다.
import random

words = [
    "Forrest Gump", "The Godfather", "The Green Mile", "Goodfellas",
    "Scarface", "The Terminal", "Million Dollar Baby", "Chinatown"
]

word = random.choice(words).upper()
guesses = ""
turns = 10
2. 단어 출력 및 사용자 입력 검증
단어를 돌면서 사용자가 맞춘 글자는 표시하고, 아직 맞추지 못한 글자는 밑줄(_)로 표시합니다.
while turns > 0:
    failed = 0
    for char in word:
        if char in guesses:
            print(char, end=" ")
        elif char == " ":
            print(' / ', end=" ")
        else:
            print("_", end=" ")
            failed += 1

    if failed == 0:
        print("\n축하합니다! 이겼습니다. :)")
        break

    guess = input("\n알파벳을 입력하세요: ").upper()
    guesses += guess

    if guess not in word:
        turns -= 1
        print("\n틀렸습니다! 남은 기회: ", turns)
참고 자료
HOUSING PRICES PREDICTION
프로젝트 설명
IPL SCORE PREDICTOR
Website Link - https://iplscorepredicting.herokuapp.com/
Website Layout
.png)
.png)
.png)
IPL Score Predictor (IPL 점수 예측기)
이 프로젝트는 과거 IPL(Indian Premier League) 경기 데이터를 바탕으로 현재 경기의 최종 점수를 예측하는 웹 애플리케이션입니다. Flask 프레임워크를 사용하며, 머신러닝 알고리즘인 Random Forest Regressor를 활용하여 예측 모델을 구현했습니다.
주요 기능
- 실시간 예측: 사용자가 타격 팀, 투구 팀, 현재 오버, 득점, 아웃 카운트 등을 입력하면 최종 점수 범위를 예측합니다.
- 머신러닝 기반:
model.pkl에 저장된 Random Forest 모델을 사용하여 학습된 데이터를 바탕으로 결과를 산출합니다. - 웹 인터페이스: Flask를 이용한 직관적인 웹 화면을 통해 누구나 쉽게 점수를 예측해 볼 수 있습니다.
코드 설명
1. 예측 로직 (app.py)
Flask 서버는 사용자의 입력을 받아 적절한 형태로 변환(One-Hot Encoding 등)한 뒤 모델에 전달합니다.
@app.route('/predict', methods=['POST'])
def predict():
    temp_array = list()
    if request.method == 'POST':
        batting_team = request.form['batting-team']
        # 팀 이름을 숫자로 변환 (One-Hot Encoding 형식)
        if batting_team == 'Chennai Super Kings':
            temp_array = temp_array + [1,0,0,0,0,0,0,0]
        # ... 기타 팀 변환 로직 ...

        overs = float(request.form['overs'])
        runs = int(request.form['runs'])
        wickets = int(request.form['wickets'])

        # 모델 입력 데이터 구성
        temp_array = temp_array + [overs, runs, wickets, runs_in_prev_5, wickets_in_prev_5]
        data = np.array([temp_array])

        # 점수 예측
        my_prediction = int(regressor.predict(data)[0])
        return render_template('index1.html', prediction_text="예측 점수 범위: {} ~ {}".format(my_prediction-10, my_prediction+5))
2. 모델 로드
pickle 라이브러리를 사용하여 미리 학습된 머신러닝 모델을 불러옵니다.
import pickle

filename = 'model.pkl'
regressor = pickle.load(open(filename, 'rb'))
참고 자료
Iris flowers Data Classification using Python Machine Learning
Iris flowers dataset is one of the best dataset in classification literature. The classification of iris flowers machine learning project is often referred to as the basic program of machine learning.
Using:
- google colab
- numpy
- pandas
- scikit-learn
Dataset description
From the UCI Machine Learning Repository.
Features:
- sepal length (cm)
- sepal width (cm)
- petal length (cm)
- petal width (cm)
- species (Iris-setosa, Iris-versicolor, Iris-virginica)
#On this project are testing a multiple regrassion model there example are below
- DecisionTreeClassifier Model
- KNeighborsClassifier Model
- Logistic regression Model -Support vector machine Model
References
*https://medium.com/gft-engineering/start-to-learn-machine-learning-with-the-iris-flower-classification-challenge-4859a920e5e3
*https://www.neuraldesigner.com/learning/examples/iris-flowers-classification
*https://www.skyfilabs.com/project-ideas/iris-flower-classification-using-machine-learning
*https://analyticsindiamag.com/start-building-first-machine-learning-project-famous-dataset/
*https://www.youtube.com/watch?v=FLuqwQgSBDw&ab_channel=AppliedAICourse
*https://www.youtube.com/watch?v=CLvboTdwpjc&ab_channel=RealKnow
*https://youtu.be/Y17Y_8RK6pc?list=PL5tcWHG-UPH1OeZ2vU5xQd7RVpkWvwJny
*https://youtu.be/ACdBKML9l4s
The goal is to predict the species of a new sample of iris flower given its features.
Iris Flower Classification using ML (머신러닝을 이용한 붓꽃 분류)
이 프로젝트는 유명한 Iris(붓꽃) 데이터셋을 활용하여 꽃잎과 꽃받침의 크기에 따라 붓꽃의 종(Species)을 분류하는 머신러닝 프로젝트입니다. EDA(탐색적 데이터 분석)부터 모델 학습 및 평가까지의 전 과정을 포함합니다.
주요 기능
- 데이터 탐색 및 시각화:
seaborn과matplotlib을 사용하여 데이터의 분포, 상관관계, 이상치 등을 다양한 그래프로 확인합니다. - 분류 모델 학습: Scikit-learn의 SVM(Support Vector Machine) 알고리즘을 사용하여 높은 정확도의 분류 모델을 구축합니다.
- 성능 평가: 테스트 데이터를 활용하여 모델의 분류 성능을 점수로 확인합니다.
코드 설명
1. 데이터 시각화
데이터의 특성을 파악하기 위해 다양한 종류의 그래프를 활용합니다.
import seaborn as sn
import matplotlib.pyplot as plt

df = sn.load_dataset('iris')

# 밀도 그래프 (Density Plot)
df.plot(kind='density', subplots=True, layout=(3,3), sharex=False)

# 산점도 행렬 (Pairplot)
sn.pairplot(df)
2. 모델 학습 및 평가
SVM 알고리즘 중 하나인 SVC를 사용하여 모델을 정의하고 학습시킵니다.
from sklearn.model_selection import train_test_split
from sklearn.svm import SVC

# 학습 데이터와 테스트 데이터 분리
X_train, X_test, Y_train, Y_test = train_test_split(X, Y, test_size=0.2)

# 모델 생성 및 학습
model = SVC()
model.fit(X_train, Y_train)

# 정확도 확인
accuracy = model.score(X_test, Y_test)
print(f"모델 정확도: {accuracy}")
참고 자료
IRIS_FLOWER_DETECTION
IRIS_FLOWER_DETECTION (머신러닝을 이용한 붓꽃 분류)
이 프로젝트는 붓꽃(Iris) 데이터셋을 활용하여 꽃잎(Petal)과 꽃받침(Sepal)의 길이 및 너비를 기반으로 꽃의 종류를 인공지능으로 분류하는 머신러닝 프로젝트입니다.
주요 특징
- 데이터 탐색 및 시각화:
pandas,matplotlib,seaborn라이브러리를 사용하여 데이터의 분포와 특성 간의 관계를 시각적으로 분석합니다. - 머신러닝 모델 사용: 서포트 벡터 머신(SVM) 알고리즘인
SVC를 사용하여 정교한 분류 모델을 생성합니다. - 모델 최적화 (Hyperparameter Tuning):
GridSearchCV를 활용하여 모델의 성능을 결정하는 파라미터(C,gamma)의 최적 조합을 찾습니다. - 상세한 성능 평가: 분류 보고서(Classification Report)와 혼동 행렬(Confusion Matrix)을 통해 모델이 얼마나 정확하게 분류했는지 평가합니다.
코드 설명
이 프로젝트의 핵심 머신러닝 단계는 다음과 같습니다.
1. 데이터 시각화 (EDA)
seaborn의 pairplot을 사용하여 각 품종별 데이터 분포를 한눈에 파악합니다.
import seaborn as sns
sns.pairplot(iris, hue='species', palette='Dark2')
2. 모델 학습 및 최적화
GridSearchCV를 사용하여 최적의 파라미터를 찾고 모델을 학습시킵니다.
from sklearn.model_selection import GridSearchCV
from sklearn.svm import SVC

param_grid = {'C': [0.1, 1, 10, 100], 'gamma': [1, 0.1, 0.01, 0.001]}
grid = GridSearchCV(SVC(), param_grid, refit=True, verbose=2)
grid.fit(X_train, y_train)
3. 예측 및 평가
완성된 모델로 테스트 데이터를 예측하고 정확도를 분석합니다.
from sklearn.metrics import classification_report, confusion_matrix
grid_predictions = grid.predict(X_test)
print(confusion_matrix(y_test, grid_predictions))
print(classification_report(y_test, grid_predictions))
참고 자료
Latitude-Longitude-To-Address-Converter
A webpage that accepts Latitude and Longitude co-ordinates and displays the corresponding address.
Install the Requirements
$ pip3 install -r requirements.txt
Run the Django Server
$ python3 manage.py runserver
LATITUDE-LONGITUDE-TO-ADDRESS-CONVERTER (좌표-주소 변환기)
이 프로젝트는 위도(Latitude)와 경도(Longitude) 좌표를 입력받아 해당 위치의 실제 도로명 주소를 찾아주는 Django 기반 웹 애플리케이션입니다.
주요 특징
- 역지오코딩(Reverse Geocoding): 위경도 좌표를 사용하여 전 세계 어디든 주소를 찾아주는 기술을 구현했습니다.
- Geopy 라이브러리 활용: 다양한 위치 기반 서비스를 제공하는
geopy라이브러리의Nominatim엔진을 사용합니다. - 사용자 친화적인 인터페이스: 위도와 경도를 입력하고 주소를 즉시 확인할 수 있는 간단하고 직관적인 웹 폼을 제공합니다.
코드 설명
애플리케이션의 핵심 기능을 담당하는 코드의 일부입니다.
1. 주소 변환 클래스 (app/latLongToAddressConverter.py)
geopy의 Nominatim을 초기화하고 좌표를 주소로 변환하는 기능을 수행합니다.
from geopy.geocoders import Nominatim

class AddressConverter:
    def findAddress(self, lat, lon):
        geolocator = Nominatim(user_agent="App", timeout=100)
        s = f"{lat},{lon}"
        try:
            location = geolocator.reverse(s)
            return location.address if location else "Location's Street Address Not Found!"
        except ValueError as e:
            return e
2. Django 뷰 처리 (app/views.py)
사용자의 POST 요청에서 좌표를 받아 변환기에 전달하고 결과를 화면으로 다시 보냅니다.
from app.latLongToAddressConverter import AddressConverter

def index(request):
    if request.method == 'POST':
        lat = request.POST['lat']
        lon = request.POST['lon']
        addressConverter = AddressConverter()
        streetAddress = addressConverter.findAddress(lat, lon)
        context = {'streetAddress': streetAddress, 'lat': lat, 'lon': lon}
        return render(request, 'app/index.html', context)
    return render(request, 'app/index.html')
참고 자료
LICENSE_PLATE_DETECTION
LICENSE_PLATE_DETECTION (자동차 번호판 검출 및 인식)
이 프로젝트는 OpenCV와 Pytesseract 라이브러리를 사용하여 이미지 파일에서 자동차 번호판을 검출하고, 번호판에 적힌 텍스트를 인식하여 출력하는 예제입니다.
주요 특징
- 이미지 전처리:
cv2.cvtColor,cv2.bilateralFilter,cv2.Canny등을 사용하여 노이즈를 제거하고 외곽선을 강조합니다. - 윤곽선 검출:
cv2.findContours를 통해 이미지 내의 다양한 윤곽선을 찾고, 번호판 특유의 사각형 모양을 식별합니다. - OCR 인식: 오픈소스 OCR 엔진인 Tesseract를 연동하여 검출된 번호판 영역에서 텍스트를 추출합니다.
코드 설명
1. 이미지 읽기 및 전처리
사용자로부터 이미지를 선택받아 흑백 전환 및 필터링을 거쳐 외곽선을 추출합니다.
import cv2
import imutils

image = cv2.imread(file)
image = imutils.resize(image, width=500)
gray = cv2.cvtColor(image, cv2.COLOR_BGR2GRAY)
gray = cv2.bilateralFilter(gray, 11, 17, 17) # 노이즈 제거
edged = cv2.Canny(gray, 170, 200) # 외곽선 검출
2. 번호판 영역 식별
검출된 윤곽선 중 면적이 큰 상위 30개를 분석하여 4개의 꼭짓점을 가진 사각형 영역을 찾습니다.
contours, _ = cv2.findContours(edged.copy(), cv2.RETR_LIST, cv2.CHAIN_APPROX_SIMPLE)
contours = sorted(contours, key=cv2.contourArea, reverse=True)[:30]

for c in contours:
    perimeter = cv2.arcLength(c, True)
    approx = cv2.approxPolyDP(c, 0.02 * perimeter, True)
    if len(approx) == 4: # 사각형 모양인 경우 번호판으로 간주
        Number_Plate_Contour = approx
        break
3. OCR을 이용한 텍스트 추출
추출된 번호판 영역을 이진화 처리한 후 Tesseract를 통해 문자를 인식합니다.
import pytesseract

# Tesseract 실행 경로 설정 (Windows 환경 예시)
pytesseract.pytesseract.tesseract_cmd = r"C:\Program Files (x86)\Tesseract-OCR\tesseract.exe"

text = pytesseract.image_to_string(processed_img)
print("Detected Number is:", text)
참고 자료
LOAN PREDICTION
LOAN PREDICTION (대출 승인 예측)
이 프로젝트는 고객의 개인정보와 금융 데이터를 분석하여 대출 승인 여부를 예측하는 머신러닝 프로젝트입니다. 데이터 전처리, 탐색적 데이터 분석(EDA), 그리고 모델링 과정을 포함하고 있습니다.
주요 특징
- 데이터 전처리 및 EDA: 결측치 처리, 파생 변수 생성, 그리고
seaborn라이브러리를 이용한 데이터 시각화를 통해 승인 여부에 영향을 미치는 주요 요인을 분석합니다. - 분류 모델 구축: SVM(Support Vector Machine) 알고리즘을 사용하여 대출 승인 가능성을 이진 분류(Binary Classification)합니다.
- 성능 분석: 성별, 결혼 여부, 부양 가족 수, 교육 수준 등에 따른 대출 승인 확률의 차이를 시각적으로 확인하고 모델의 성능을 평가합니다.
코드 설명
분석 및 모델링 과정의 주요 단계는 다음과 같습니다.
1. 데이터 탐색 및 시각화
대출 승인 상태(Loan_Status)에 따른 성별, 결혼 여부 등의 분포를 확인합니다.
import seaborn as sns
import matplotlib.pyplot as plt

# 성별에 따른 대출 승인 여부 시각화
sns.countplot(data['Loan_Status'], hue=data['Gender'])
2. 데이터 전처리
불필요한 열을 제거하고 머신러닝 모델 학습을 위해 데이터를 정제합니다.
import pandas as pd

data = pd.read_csv('dataset.csv')
# Loan_ID 열 제거
data.drop(['Loan_ID'], axis=1, inplace=True)
# 결측치 확인
print(data.isnull().sum())
3. 모델 학습 및 평가
Scikit-learn을 사용하여 분류 모델을 학습시키고 성능을 확인합니다. (노트북에는 model_svm.pkl 파일이 포함되어 있어 학습된 모델을 불러와 사용할 수도 있습니다.)
참고 자료
- Scikit-learn Support Vector Machines
- Pandas Documentation for Data Analysis
- Seaborn Visualization Guide
To learn more about opencv library :- https://opencv.org/ https://www.tutorialspoint.com/opencv/opencv_overview.html https://www.pyimagesearch.com/
To learn more about image processing:- http://opencv-python-tutroals.readthedocs.io/en/latest/py_tutorials/py_imgproc/py_table_of_contents_imgproc/py_table_of_contents_imgproc.html https://analyticsindiamag.com/guide-to-opencv-functions-for-image-processing/
Problems u may face :-
- if packages used in program are not installed in ur system
=> use !pip install
<package-name>in ur jupyter notebook. - In linux u need to explicitly setup ur camera
Keep Exploring !
Live sketching project (실시간 스케치 변환 프로젝트)
이 프로젝트는 웹캠 피드를 실시간으로 분석하여 연필로 그린 듯한 스케치 효과를 적용하는 OpenCV 기반의 파이썬 애플리케이션입니다.
주요 특징
- 실시간 비디오 처리: 웹캠에서 실시간으로 프레임을 캡처하여 처리합니다.
- 이미지 세분화 및 효과 적용: 그레이스케일 변환, 가우시안 블러, 캐니 엣지 검출(Canny Edge Detection) 및 임계값 처리(Thresholding)를 통해 스케치 효과를 구현합니다.
- 상호작용성: 웹캠이 켜진 상태에서 실시간으로 변화를 확인할 수 있으며, 엔터(Enter) 키를 눌러 종료할 수 있습니다.
코드 설명
스케치 효과를 만드는 핵심 함수와 실행 과정은 다음과 같습니다.
1. 스케치 생성 함수
입력받은 이미지를 필터링하여 스케치 이미지로 변환합니다.
def sketch(image):
    # 이미지를 흑백으로 변환
    img_gray = cv2.cvtColor(image, cv2.COLOR_BGR2GRAY)

    # 가우시안 블러로 노이즈 제거
    img_gray_blur = cv2.GaussianBlur(img_gray, (5,5), 0)

    # 에지 추출 (Canny Edge Detection)
    canny_edges = cv2.Canny(img_gray_blur, 20, 50)

    # 이진화 처리로 결과 반전
    ret, mask = cv2.threshold(canny_edges, 70, 255, cv2.THRESH_BINARY_INV)
    return mask
2. 웹캠 제어 및 루프
웹캠을 활성화하고 매 프레임마다 스케치 기능을 적용합니다.
cap = cv2.VideoCapture(0)

while True:
    ret, frame = cap.read()
    # 변환된 스케치 이미지를 보여줌
    cv2.imshow('Our Live Sketcher', sketch(frame))
    # 엔터 키(13)가 눌리면 루프 종료
    if cv2.waitKey(1) == 13:
        break

cap.release()
cv2.destroyAllWindows()
참고 자료
MyAlarm
MyAlarm (알람 시계 프로젝트)
이 프로젝트는 파이썬의 tkinter 라이브러리를 사용하여 구현한 간단한 GUI 알람 시계 애플리케이션입니다.
주요 특징
- GUI 인터페이스:
tkinter를 사용하여 시간(시, 분)을 입력할 수 있는 사용자 인터페이스를 제공합니다. - 실시간 시간 모니터링:
datetime모듈을 사용하여 현재 시간을 초 단위로 확인하고 설정된 알람 시간과 비교합니다. - 사운드 알람: 설정된 시간에 도달하면 파일 시스템을 통해 지정된 음악 파일(예:
HeyYa.mp3)을 실행합니다.
코드 설명
1. 알람 기능 로직
설정된 시간과 현재 시간을 비교하여 일치하면 음악을 실행합니다.
def alarm(set_alarm):
    while True:
        time.sleep(1) # 1초마다 확인
        current_time = datetime.datetime.now().time()
        current_time = str(current_time)[:5] # HH:MM 형식으로 변환
        if current_time == set_alarm:
            print("Time to wake up")
            os.system("start HeyYa.mp3") # 음악 파일 실행
            break
2. GUI 구성
사용자로부터 알람 시간을 입력받기 위한 화면을 구성합니다.
hour = StringVar()
minute = StringVar()

# 시간 및 분 입력 칸 생성
Entry(root, textvariable=hour, width=5).place(x=10, y=30)
Entry(root, textvariable=minute, width=5).place(x=50, y=30)

# 알람 설정 버튼
Button(root, text="Set alarm", command=actual_time).place(x=10, y=70)
참고 자료
NOTIFICATION_APP
NOTIFICATION_APP (데스크탑 알림 애플리케이션)
이 프로젝트는 파이썬의 plyer 라이브러리를 사용하여 사용자의 데스크탑이나 노트북 화면에 시스템 알림을 표시하는 간단한 도구입니다.
주요 특징
- 간편한 알림 설정:
plyer.notification을 사용하여 제목(Title), 내용(Message), 그리고 알림이 표시될 시간(Timeout)을 쉽게 설정할 수 있습니다. - 크로스 플랫폼 지원:
plyer라이브러리는 Windows, macOS, Linux 등 다양한 운영체제에서 알림 기능을 지원합니다.
코드 설명
알림을 생성하는 코드는 다음과 같이 매우 간단합니다.
from plyer import notification

# 데스크탑 알림 실행
notification.notify(
    title = "e-mail notification", # 알림 제목
    message = "you have 3 unread messages", # 알림 내용
    timeout = 10, # 알림이 표시되는 시간(초)
)
참고 자료
PASSWORD_MANAGER
PASSWORD_MANAGER (비밀번호 관리 매니저)
이 프로젝트는 Tkinter를 사용하여 구현된 비밀번호 생성 및 관리 도구입니다. 임의의 강력한 비밀번호를 생성하고, 이를 사용자 이름 및 웹사이트 정보와 함께 파일에 저장할 수 있습니다.
주요 특징
- 비밀번호 생성: 보안 수준(낮음, 중간, 높음)과 길이를 선택하여 무작위 비밀번호를 생성합니다.
- 클립보드 복사: 생성된 비밀번호를 즉시 복사하여 편리하게 사용할 수 있습니다.
- 데이터 저장 및 조회:
info.txt파일에 계정 정보(사용자 이름, 비밀번호, 웹사이트)를 안전하게 기록하고, 저장된 전체 정보를 콘솔에서 조회할 수 있습니다. - 사용자 친화적 GUI: 직관적인 레이아웃을 통해 누구나 쉽게 비밀번호를 관리할 수 있습니다.
코드 설명
1. 비밀번호 생성 로직
선택된 보안 등급에 따라 문자, 숫자, 특수문자를 조합합니다.
def low():
    # 길이 및 문자 셋 설정
    lower = "abcdefghijklmnopqrstuvwxyz"
    upper = "...(대문자 포함)..."
    digits = "...(특수문자 및 숫자 포함)..."

    # 보안 등급에 따른 생성
    if var.get() == 1: # Low
        for i in range(0, length):
            password = password + random.choice(lower)
    # ... (Medium, Strong 로직 생략)
2. 파일 입출기능
비밀번호 정보를 텍스트 파일에 추가로 기록합니다.
def appendNew():
    file = open("info.txt", 'a')
    # 입력 폼에서 데이터 가져오기
    userName = entry1.get()
    website = entry2.get()
    # 파일에 포맷팅하여 저장
    file.write(f"UserName: {userName}\nPassword: {pwd}\nWebsite: {web}\n")
    file.close()
참고 자료
PIN_YOUR_NOTE
PIN_YOUR_NOTE (핀 유어 노트)
이 프로젝트는 파이썬의 tkinter 라이브러리를 사용하여 개발된 간단한 메모 애플리케이션입니다. 사용자가 입력한 메모를 화면 상의 새 창에 현재 시간과 함께 표시해 줍니다.
주요 특징
- 간단한 입력 인터페이스: 콘솔(CLI)을 통해 사용자의 노트를 입력받습니다.
- GUI 메모 표시: 입력된 메모를 별도의 GUI 창(
tkinter)에 띄워줍니다. - 시간 기록: 메모를 작성하여 게시한 시점의 시간을 자동으로 기록하여 시각화합니다.
코드 설명
1. CLI 및 GUI 통합 실행
콘솔에서 입력을 받고 이를 GUI 창의 라벨로 전달합니다.
def cli():
    import time
    # 현재 시간 포맷팅
    current_time = time.strftime("%H:%M")

    # 사용자 입력 받기
    note_input = input("Type your notes here: ")

    # GUI 창 구성
    root = tk.Tk()
    root.title("Pin Your Note")

    # 시간과 메모를 라벨로 추가
    tk.Label(root, text=current_time).pack()
    tk.Label(root, text=note_input).pack()

    root.mainloop()
참고 자료
QUIZ APP
QUIZ APP (퀴즈 애플리케이션)
이 프로젝트는 파이썬 객체 지향 프로그래밍(OOP) 개념을 활용하여 제작된 간단한 콘솔 기반 퀴즈 프로그램입니다.
주요 특징
- 객체 지향 설계:
Question클래스를 정의하여 문제 내용과 정답을 효율적으로 관리합니다. - 다양한 문제 구성: 파이썬 상식 및 코드 결과 예측과 관련된 여러 문항이 준비되어 있습니다.
- 점수 산출 및 피드백: 테스트 종료 후 맞춘 개수에 따라 "EXCELLENT", "WELL DONE" 등의 맞춤형 피드백을 제공합니다.
- 정답 확인 기능: 사용자가 원할 경우 테스트 완료 후 각 문항의 정답을 확인할 수 있습니다.
코드 설명
1. 문제 데이터 관리
문제 지문과 정답을 클래스 인스턴스로 생성하여 리스트에 저장합니다.
class Question:
    def __init__(self, prompt, answer):
        self.prompt = prompt
        self.answer = answer

# 문제 리스트 생성
questions = [
    Question(question_prompt[0], "b"),
    # ...
]
2. 테스트 실행 로직
사용자의 입력을 받아 정답 여부를 판별하고 최종 점수를 계산합니다.
def run_test(questions):
    score = 0
    for q in questions:
        answer = input(q.prompt)
        if answer == q.answer:
            score += 1
    print(f"You got {score} / {len(questions)} correct")
참고 자료
ROCK_PAPER_SCISSOR
ROCK_PAPER_SCISSOR (가위바위보 게임)
이 프로젝트는 파이썬의 random 모듈을 사용하여 사용자와 컴퓨터 간의 가위바위보 대결을 구현한 콘솔 기반 게임입니다.
주요 특징
- 사용자 맞춤형: 플레이어의 이름을 입력받아 게임 결과에 반영합니다.
- 무작위 AI: 컴퓨터는
randint함수를 사용하여 바위(0), 보(1), 가위(2) 중 하나를 무작위로 선택합니다. - 입력 유효성 검사: 사용자가 잘못된 값을 입력했을 때 경고 메시지를 보여주고 다시 입력받도록 설계되었습니다.
- 반복 실행: 사용자가 종료(0 입력)를 원할 때까지 게임이 계속 진행됩니다.
코드 설명
1. 무작위 선택 루프
컴퓨터의 선택을 생성하고 사용자의 유효한 입력을 기다립니다.
from random import randint

# 컴퓨터의 무작위 선택 (0: 바위, 1: 보, 2: 가위)
y = randint(0, 2)

# 유효한 입력을 위한 내부 루프
inputs = ["rock", "paper", "scissor"]
while True:
    x = input("SELECT YOUR CHOICE rock paper scissor: ").lower()
    if x in inputs:
        break
    print("That's not a valid play. Check your spelling!")
2. 승패 판정 로직
각 선택에 따른 경우의 수를 if-elif 문으로 상세히 구분하여 승자를 결정합니다.
if x == "rock" and y == 0:
    print("computer move is rock\nResult: TIE")
elif x == "rock" and y == 1:
    print("computer move is paper\nResult: CPU WON")
# ... (생략)
참고 자료
ROLLING_DICE
ROLLING_DICE (주사위 굴리기 게임)
이 프로젝트는 무작위 숫자를 생성하여 주사위를 굴리는 과정을 시뮬레이션하는 간단한 파이썬 프로그램입니다.
주요 특징
- 무작위성:
random.randint(1, 6)함수를 사용하여 실제 주사위와 동일하게 1에서 6 사이의 숫자를 임의로 생성합니다. - 반복성: 주사위를 한 번 굴린 후, 사용자의 선택에 따라 계속해서 다시 굴릴 수 있도록 루프 구조를 갖추고 있습니다.
- 재귀적 입력 확인: 사용자가 빈 값을 입력하거나 잘못된 경로를 입력했을 때,
roll_dice함수를 재귀적으로 호출하여 올바른 입력을 유도합니다.
코드 설명
1. 주사위 굴리기 루프
주사위 값을 출력하고 사용자의 게임 지속 여부를 확인합니다.
import random

# 게임 시작
dice_value = random.randint(1, 6)
print('You got ', dice_value)

# 반복 실행 로직
while True:
    choice = input("Do you want to play again? (Yes/No): ")
    if choice.lower() == 'no':
        break
    elif choice.lower() == 'yes':
        print('You got ', random.randint(1, 6))
    else:
        print('Wrong Input !!!')
참고 자료
SECURE_YOUR_PASSWORD
SECURE_YOUR_PASSWORD (비밀번호 보안 강화 도구)
이 프로젝트는 입력된 문자열의 각 문자를 미리 정의된 특수 기호 맵에 따라 변환하여, 일반 범용 텍스트를 복잡한 기호 조합의 비밀번호로 바꿔주는 간단한 보안 유틸리티입니다.
주요 특징
- 기호 매핑 방식: 딕셔너리(
sym)를 사용하여 알파벳 각 문자에 대응하는 고유한 특수 기호를 설정합니다. - 간단한 변환 로직: 반복문을 이용해 입력값의 각 문자를 확인하고, 해당되는 기호로 치환하여 결과를 생성합니다.
- 커스터마이징 가능: 매핑 딕셔너리를 수정하여 자신만의 고유한 암호화 규칙을 만들 수 있습니다.
코드 설명
1. 매핑 딕셔너리 구성
알파벳 소문자에 대응하는 특수 기호들을 정의합니다.
sym = {
    'a' : '!!',
    'b' : '@',
    'c' : '#',
    # ... (생략)
    'z' : '|',
}
2. 변환 엔진
입력 문자열을 순회하며 비밀번호를 빌드합니다.
inp = 'alphabet'
password = ''

for i in inp:
    for key, val in sym.items():
        if i in key:
            password = password + val

print("Original Name:", inp)
print("Secured Password:", password)
참고 자료
SENTIMENT_ANALYSER_ML_PROJECT (감성 분석기 프로젝트)
이 프로젝트는 텍스트 데이터를 분석하여 그 안에 담긴 감정(Emotion)을 분류하고 시각화하는 자연어 처리(NLP) 기반의 기초 머신러닝 프로젝트입니다.
주요 특징
- 텍스트 전처리: 대소문자 변환, 문장 부호 제거, 불용어(Stop words) 제거를 통해 분석에 필요한 핵심 단어들을 추출합니다.
- 감정 매핑:
emotions.txt파일을 활용하여 각 단어가 어떤 특정 감정(행복, 슬픔, 화남 등)을 나타내는지 매칭합니다. - 결과 시각화:
matplotlib라이브러리를 사용하여 분석된 감정들의 분포를 막대 그래프(Bar Chart)로 시각화합니다.
코드 설명
1. 데이터 클리닝 및 토큰화
텍스트에서 의미 없는 기호나 불용어를 걸러냅니다.
# 문장 부호 제거 및 소문자 변환
cleaned_text = lower_case.translate(str.maketrans('', '', string.punctuation))
tokenized_words = cleaned_text.split()

# 불용어(Stop words) 필터링
final_words = [word for word in tokenized_words if word not in stop_words]
2. 감정 분석 알고리즘
준비된 감정 사전을 읽어와 추출된 단어들과 비교합니다.
emotion_list = []
with open('emotions.txt', 'r') as file:
    for line in file:
        word, emotion = line.replace("\n", '').replace(",", '').split(':')
        if word in final_words:
            emotion_list.append(emotion)
3. 결과 그래프 저장
분석된 감정의 빈도수를 그래프로 나타냅니다.
from collections import Counter
w = Counter(emotion_list)

fig, ax1 = plt.subplots()
ax1.bar(w.keys(), w.values())
plt.savefig('graph.png') # 결과를 이미지로 저장
참고 자료
SENTIMENT_ANALYSIS_ML_PROJECT
SENTIMENT_ANALYSIS_ML_PROJECT (트위터 감성 분석 프로젝트)
이 프로젝트는 트위터 데이터를 활용하여 긍정적 또는 부정적 감성을 분류하는 고도화된 머신러닝 프로젝트입니다. 텍스트 정제부터 다양한 분류 알고리즘 적용까지의 전 과정을 포함합니다.
주요 특징
- 고급 데이터 전처리: 사용자 핸들(@user) 제거, 특수 문자 및 짧은 단어 필터링, 그리고 어간 추출(Stemming)을 통해 텍스트 데이터를 정규화합니다.
- 다양한 머신러닝 알고리즘:
- 로지스틱 회귀 (Logistic Regression)
- XGBoost 분류기 (XGBClassifier)
- 결정 트리 (Decision Tree)
- 성능 평가: Accuracy와 F1-score를 사용하여 모델의 정밀도를 측정하고 비교합니다.
- 방대한 데이터셋: 약 3만 건 이상의 트레이닝 데이터를 처리하여 높은 신뢰도의 모델을 구축합니다.
코드 설명
1. 텍스트 정제 (Tidying Tweets)
정규표현식을 사용하여 중복되거나 무의미한 패턴을 제거합니다.
import re

def remove_pattern(text, pattern):
    r = re.findall(pattern, text)
    for i in r:
        text = re.sub(i, "", text)
    return text

# @user 패턴 제거 및 짧은 단어 필터링
combine['Tidy_Tweets'] = np.vectorize(remove_pattern)(combine['tweet'], "@[\w]*")
combine['Tidy_Tweets'] = combine['Tidy_Tweets'].apply(lambda x: ' '.join([w for w in x.split() if len(w)>3]))
2. 토큰화 및 어간 추출
단어를 기본 형태로 변환하여 모델이 학습하기 좋은 상태로 만듭니다.
from nltk import PorterStemmer
ps = PorterStemmer()

tokenized_tweet = combine['Tidy_Tweets'].apply(lambda x: x.split())
tokenized_tweet = tokenized_tweet.apply(lambda x: [ps.stem(i) for i in x])
3. 모델 학습 및 평가
Scikit-learn과 XGBoost를 활용하여 분류 모델을 생성합니다.
from sklearn.linear_model import LogisticRegression
from xgboost import XGBClassifier

# 모델 학습 예시 (Logistic Regression)
lreg = LogisticRegression()
lreg.fit(xtrain_bow, ytrain)
prediction = lreg.predict_proba(xvalid_bow)
참고 자료
SINE_VS_COSINE
SINE_VS_COSINE (사인 vs 코사인 그래프 시각화)
이 프로젝트는 파이썬의 numpy와 matplotlib 라이브러리를 사용하여 삼각함수인 사인(Sine)과 코사인(Cosine) 파형을 그래프로 그려보고 비교하는 데이터 시각화 기초 예제입니다.
주요 특징
- 데이터 생성:
numpy.linspace를 사용하여 -2π에서 2π까지의 구간을 정밀하게 나누어 X축 데이터를 생성합니다. - 삼각함수 계산:
numpy.sin과numpy.cos함수를 통해 각 지점에서의 진폭(Amplitude)을 계산합니다. - 그래프 커스터마이징: 제목, 축 이름 설정 및 그리드(Grid)를 추가하여 그래프의 가독성을 높였습니다.
코드 설명
1. 데이터 준비
수학적 연산을 위해 넘파이 배열을 생성합니다.
import numpy as np

# -2π 에서 2π 까지 256개의 점 생성
time = np.linspace(-2*np.pi, 2*np.pi, 256, endpoint=True)
amplitude_sin = np.sin(time)
amplitude_cos = np.cos(time)
2. 그래프 시각화
matplotlib을 사용하여 두 파형을 한 화면에 출력합니다.
import matplotlib.pyplot as plot

plot.plot(time, amplitude_sin) # 사인 곡선
plot.plot(time, amplitude_cos) # 코사인 곡선

plot.title('Sine & Cos wave')
plot.grid(True, which='both') # 그리드 활성화
plot.axhline(y=0, color='k')  # X축 강조
plot.show()
참고 자료
STOCK_PRICE_PREDICTION
STOCK_PRICE_PREDICTION (주가 예측 프로젝트)
이 프로젝트는 딥러닝 알고리즘인 LSTM(Long Short-Term Memory)을 사용하여 구글(Google)의 과거 주가 데이터를 학습하고 미래의 종가를 예측하는 인공지능 프로젝트입니다.
주요 특징
- 시계열 데이터 처리: 과거 100일간의 주가 흐름을 입력값으로 받아 다음 날의 가격을 예측하는 슬라이딩 윈도우(Sliding Window) 방식을 사용합니다.
- 순환 신경망(RNN) 모델:
- 양방향 LSTM(Bidirectional LSTM)을 사용하여 데이터의 전후 맥락을 모두 파악합니다.
- Keras의
SequentialAPI를 이용해 여러 층의 신경망을 구성했습니다.
- 데이터 정규화:
MinMaxScaler를 사용하여 주가 데이터를 0과 1 사이의 값으로 변환함으로써 모델의 학습 속도와 성능을 향상시켰습니다. - GPU 가속 학습: 많은 양의 연산을 빠르게 처리하기 위해 GPU 가속 기능을 활용하여 모델을 훈련했습니다.
코드 설명
1. 데이터 정규화 및 변환
LSTM 모델에 적합하도록 데이터를 스케일링하고 타임스탬프 형식으로 변환합니다.
from sklearn.preprocessing import MinMaxScaler

# 0~1 사이로 정규화
minmax = MinMaxScaler()
scaled_data = minmax.fit_transform(close_price.reshape(-1, 1))

# 100일 단위의 데이터 셋 생성
data_stamps = []
for i in range(len(scaled_data) - 100):
    data_stamps.append(scaled_data[i:i+100])
2. LSTM 신경망 모델 구축
양방향 LSTM 층과 Dense 층을 쌓아 모델을 정의합니다.
from keras.models import Sequential
from keras.layers import Dense, LSTM, Bidirectional

model = Sequential()
model.add(Bidirectional(LSTM(100, return_sequences=True), input_shape=(100, 1)))
model.add(Bidirectional(LSTM(100)))
model.add(Dense(64, activation='relu'))
model.add(Dense(1, activation='linear')) # 종가 예측을 위한 선형 활성화 함수
3. 모델 컴파일 및 학습
Adam 옵티마이저와 평균 제곱 오차(MSE) 손실 함수를 사용합니다.
model.compile(optimizer='Adam', loss='mse')
model.fit(x_train, y_train, epochs=50)
참고 자료
- Understanding LSTM Networks
- Keras Bidirectional Layer Documentation
- Stock Price Prediction using Python and LSTM
Search_and_Edit
When you type something into the search bar , the Search and Edit app will pull up information about it from Wikipedia . By enabling the Editor function, you can use it as a text editor and can disable the editor function just as easily . The Graphical User Interface has been designed using tkinter and the mini project is based on Python .
Search and edit Gui Application (위키백과 검색 및 편집 도구)
이 프로젝트는 tkinter GUI 라이브러리와 wikipedia 라이브러리를 결합하여 위키백과의 정보를 검색하고, 가져온 내용을 자유롭게 편집할 수 있는 데스크탑 애플리케이션입니다.
주요 특징
- 위키백과 통합 검색: 사용자가 입력한 키워드를 바탕으로 위키백과 API를 호출하여 요약 정보를 가져옵니다.
- 텍스트 편집 기능: 가져온 정보를 편집기 모드에서 수정할 수 있습니다. (편집 활성화/비활성화 기능 포함)
- 사용자 편의성: 스크롤바가 포함된 텍스트 영역, 검색어 초기화 기능, 에러 메시지 알림 기능을 갖추고 있습니다.
- 다크 모드 지원: 배경색과 버튼 색상에 어두운 테마를 적용하여 시각적 피로도를 줄였습니다.
코드 설명
1. 필드 및 UI 구성
클래스 기반으로 GUI 요소를 배치하고 변수를 관리합니다.
class searchwiki:
    def __init__(self, root):
        self.root = root
        self.root.title("The Searching and Editing App")
        # 검색어 저장 변수
        self.var_search = StringVar()
        # 텍스트 영역 및 스크롤바 설정
        self.txt_area = Text(frame1, font=("times new roman", 15))
        # ... (생략)
2. 검색 및 데이터 연동
wikipedia.summary를 사용하여 온라인 데이터를 실시간으로 가져옵니다.
def searchword(self):
    if self.var_search.get() == "":
        messagebox.showerror("ERROR", "Search box shouldn't be empty")
    else:
        # 위키백과 정보 수집
        fetch_data = wikipedia.summary(self.var_search.get())
        # 텍스트 영역에 삽입
        self.txt_area.insert('1.0', fetch_data)
3. 편집 모드 제어
텍스트 영역의 상태(state)를 변경하여 편집 여부를 결정합니다.
def enable(self):
    self.txt_area.config(state=NORMAL) # 편집 가능

def disable(self):
    self.txt_area.config(state=DISABLED) # 읽기 전용
참고 자료
StockPricePredictor
프로젝트 설명
TCREDIT_CARD_FRAUD_DETECTION
Credit Card Fraud Detection (신용카드 부정 사용 탐지)
이 프로젝트는 머신러닝 알고리즘(Random Forest)을 사용하여 신용카드 거래 데이터 중 사기(Fraudulent) 거래를 탐지하는 보안 솔루션 모델입니다. 고객이 구매하지 않은 항목에 대해 요금이 청구되는 것을 방지하는 데 목적이 있습니다.
주요 특징
- 데이터 불균형 처리: 정상 거래와 사기 거래의 비율 차이가 매우 큰 실제 금융 데이터를 다루며, 사기 사례의 희소성을 고려한 분석을 수행합니다.
- 탐색적 데이터 분석 (EDA): 상관관계 행렬(Correlation Matrix) 및 히트맵을 사용하여 각 변수 간의 관계와 사기 거래의 특성을 시각화합니다.
- Random Forest 모델: 앙상블 학습 기법인 랜덤 포레스트 분류기를 사용하여 높은 정확도와 정밀도로 사기 거래를 분류합니다.
- 성능 평가 지표: 정확도(Accuracy)뿐만 아니라 불균형 데이터셋에 중요한 정밀도(Precision), 재현율(Recall), F1-Score, Matthews 상관계수(MCC)를 통해 모델을 다각도로 평가합니다.
코드 설명
1. 데이터 확인 및 결측치 처리
데이터셋의 형태를 확인하고 결측치를 평균값으로 대체하여 안정적인 학습 환경을 구축합니다.
# 결측치 확인 및 대체
data['Class'] = data['Class'].fillna(0)
items = data.columns
for item in items:
    if item != 'Class':
        data[item] = data[item].fillna(data[item].mean())
2. 사기 사례 분석
정상 거래와 사기 거래의 분포 및 금액 차이를 분석합니다.
fraud = data[data['Class'] == 1]
valid = data[data['Class'] == 0]
print("사기 사례 수:", len(fraud))
print("정상 사례 수:", len(valid))
3. 모델 학습 및 평가
랜덤 포레스트 분류기를 생성하고 테스트 데이터를 통해 성능을 측정합니다.
from sklearn.ensemble import RandomForestClassifier
from sklearn.metrics import accuracy_score, precision_score, recall_score, f1_score

# 모델 생성 및 학습
rfc = RandomForestClassifier()
rfc.fit(xTrain, yTrain)

# 예측 및 성능 출력
yPred = rfc.predict(xTest)
print("정확도 (Accuracy):", accuracy_score(yTest, yPred))
참고 자료
TIC TAC TOE ( vs Computer )
TIC_TAC_TOE
TIC_TAC_TOE_MINMAX_ALGO
TITANIC_SURVIVAL_PROJECT2
TYPING_SPEED_TEST
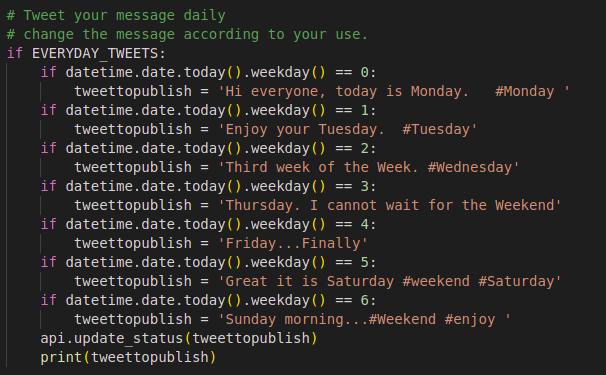
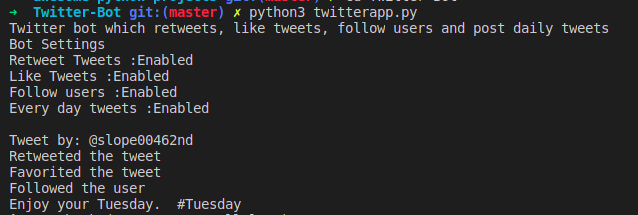
Twitter-Bot
Required Dependiencies
- Python 3.5 or above
- Tweepy
- And Twitter developer account
- Get the Four keys from the developer account and update on the credientials.py file.
Uses
-
You can search for a hashtag and like,retweet,follow the users who tweeted.
-
You can tweet on regularly basic by updating the format on the twitterapp.py file.
-
you can change your permissions by modifying config.py file.
-
Change the SLEEP_TIME in config.py file to your need.
To run
- Run the twitterapp.py file after updating the config.py and credientials.py file.
Result
URL_SHORTENER
WEATHER_APP
WORDGAMES
movie recommandation
Contributing to Awesome-Python-Projects
We love your input! We want to make contributing to this project as easy and transparent as possible, whether it's:
- Reporting a bug
- Discussing the current state of the code
- Submitting a fix
- Proposing new features
- Becoming a maintainer
We Develop with Github
We use github to host code, to track issues and feature requests, as well as accept pull requests.
We Use Github Flow, So All Code Changes Happen Through Pull Requests
Pull requests are the best way to propose changes to the codebase (we use Github Flow). We actively welcome your pull requests:
- Fork the repo and create your branch from
master. - If you've added code that should be tested, add tests.
- If you've changed APIs, update the documentation.
- Ensure the test suite passes.
- Make sure your code lints.
- Issue that pull request!
Any contributions you make will be under the MIT Software License
In short, when you submit code changes, your submissions are understood to be under the same MIT License that covers the project. Feel free to contact the maintainers if that's a concern.
Report bugs using Github's issues
We use GitHub issues to track public bugs. Report a bug by opening a new issue; it's that easy!
Write bug reports with detail, background, and sample code
Great Bug Reports tend to have:
- A quick summary and/or background
- Steps to reproduce
- Be specific!
- Give sample code if you can.
- What you expected would happen
- What actually happens
- Notes (possibly including why you think this might be happening, or stuff you tried that didn't work)
People love thorough bug reports. I'm not even kidding.
Use a Consistent Coding Style
I'm again borrowing these from Facebook's Guidelines
- 2 spaces for indentation rather than tabs
- You can try running
npm run lintfor style unification
License
By contributing, you agree that your contributions will be licensed under its MIT License.
References
This document was adapted from the open-source contribution guidelines for Facebook's Draft
Awesome-Python-Projects에 기여하기
여러분의 의견을 환영합니다! 저희는 이 프로젝트에 기여하는 과정을 가능한 한 쉽고 투명하게 만들고 싶습니다. 기여의 종류는 다음과 같습니다:
- 버그 신고
- 코드의 현재 상태에 대한 논의
- 수정 사항 제출
- 새로운 기능 제안
- 관리자 되기
저희는 깃허브로 개발합니다
저희는 코드를 호스팅하고, 이슈와 기능 요청을 추적하며, 풀 리퀘스트를 받기 위해 깃허브를 사용합니다.
저희는 깃허브 플로우를 사용하므로, 모든 코드 변경은 풀 리퀘스트를 통해 이루어집니다
풀 리퀘스트는 코드베이스에 변경 사항을 제안하는 가장 좋은 방법입니다(저희는 깃허브 플로우를 사용합니다). 저희는 여러분의 풀 리퀘스트를 적극적으로 환영합니다:
- 리포지토리를 포크하고
master에서 브랜치를 생성하세요. - 테스트가 필요한 코드를 추가했다면, 테스트를 추가하세요.
- API를 변경했다면, 문서를 업데이트하세요.
- 테스트 스위트가 통과하는지 확인하세요.
- 코드가 린트 규칙을 준수하는지 확인하세요.
- 풀 리퀘스트를 보내주세요!
여러분이 기여하는 모든 내용은 MIT 소프트웨어 라이선스 하에 있습니다
요약하자면, 여러분이 코드 변경 사항을 제출할 때, 여러분의 제출물은 프로젝트를 포괄하는 동일한 MIT 라이선스 하에 있는 것으로 간주됩니다. 이것이 우려된다면 관리자에게 자유롭게 연락하세요.
깃허브의 이슈를 사용하여 버그를 신고하세요
저희는 공개 버그를 추적하기 위해 깃허브 이슈를 사용합니다. 새로운 이슈를 열어 버그를 신고하세요. 정말 쉽습니다!
상세 정보, 배경, 샘플 코드를 포함하여 버그 보고서를 작성하세요
훌륭한 버그 보고서는 다음과 같은 경향이 있습니다:
- 간략한 요약 및/또는 배경
- 재현 단계
- 구체적으로 작성하세요!
- 가능하다면 샘플 코드를 제공하세요.
- 예상했던 결과
- 실제로 발생한 일
- 참고 사항 (이것이 왜 발생한다고 생각하는지에 대한 내용이나, 시도했지만 작동하지 않았던 내용 포함 가능)
사람들은 철저한 버그 보고서를 정말 좋아합니다. 농담이 아닙니다.
일관된 코딩 스타일 사용하기
이 내용은 페이스북의 가이드라인에서 다시 한번 빌려왔습니다.
- 탭 대신 2칸 띄어쓰기로 들여쓰기
- 스타일 통일을 위해
npm run lint를 실행해 볼 수 있습니다
라이선스
기여함으로써, 귀하는 귀하의 기여가 MIT 라이선스 하에 라이선스된다는 데 동의합니다.
참고 자료
이 문서는 페이스북의 드래프트에 대한 오픈 소스 기여 가이드라인을 바탕으로 작성되었습니다.
CODE-OF-CONDUCT
We intend to create an inclusive environment for everyone, regardless of ethnicity, religion, skin color, national origin, age, disability, sexual orientation, gender identity, parental status, marital status and political belonging as well as gender-specific expression, mental illness, socio-economic status or background. We are united by these values and uphold our unique differences.
Introduction
-
We are dedicated to providing a
harassment freeexperience for everyone, and we do not tolerate harassment of participants in any form. We ask you to be considerate of others and behave professionally and respectfully to all other participants. -
This code and related procedures also apply to unacceptable behavior occurring outside the scope of community activities, in all community venues— online and in-person— as well as in all one-on-one communications, and anywhere such behavior has the potential to adversely affect the safety and well-being of community members.
-
Admins, Mentors, Contributers are subject to these Community Guidelines and
Code of Conduct. -
Diversity and inclusion make us strong. We encourage participation from the most varied and diverse backgrounds possible and want to be very clear about where we stand.
Our goal is to maintain a safe, helpful and friendly community for everyone, regardless of experience, gender identity and expression, sexual orientation, disability, personal appearance, body size, race, ethnicity, age, religion, nationality, or other protected categories under applicable law.
EXPECTED BEHAVIOR
Don't just support your colleagues on demand, be proactive. Offer your help if you notice that a team member is struggling with a problem or otherwise needs help. Be careful not to be too patronizing or disrespectful. When someone turns to you for help, always be open, listen and try to put yourself in the position of your counterpart. If you don't have time because of a deadline, let the person know and tell them openly when you have time or maybe refer a team member who is just as familiar with the topic.
You are expected to be thoughtful and considerate towards others. In this way we contribute to a collaborative, positive and healthy environment in which the team must:
- Be inclusive
- Be collaborative
- Be professional
- Be responsible
- Be honest
- Be welcoming
- Be kind
- Be respectful of other viewpoints and ideas
- Be supportive and look out for each other
UNACCEPTABLE BEHAVIOR
We want to create a welcoming and friendly corporate culture for everyone. Discrimination and harassment are expressly prohibited. In addition, any behaviour or language that is exclusive or harassing is strongly rejected. Especially in the tech scene there exist behavior we don't like to see and that we would like to change:
- Don't be surprised if a team member is not yet familiar with a topic.
We believe in the spirit of a beginner and in the fact that one constantly wants to learn something new. It is absolutely okay to say "I don't know" or "I don't understand". The phrase "there are no stupid questions" is lived 100% by us, because that is the only way we learn. So please don't be surprised if someone is not familiar with a tool, a person or a process.
- No exclusive language
Be careful in your choice of words, no matter how banal it sounds. No, they are not only "great guys" at work, they are "great people" (including all as well). Sexist, racist, rejecting and excluding jokes are not appropriate and will not be tolerated in the team. Any kind of verbal harassment or bullying is just as strongly rejected.
- No "know-it-all" statements:
When someone says something that is almost, but not entirely correct, one tends to add a correction to what has been said before. We should always strive to save the face of others and uphold our values. In most cases, these "know-it-all" statements are not decisive for the overall conversation and are not goal-oriented, but rather annoying and a waste of time. If it is important in your eyes, then use a language that leaves others with the impression that you might be wrong or missed something important out of context and therefore take a different view now.
- No subtle comments:
Exclusive behavior is often characterized by subtle comments. To say, "It's so easy that my daughter can do it" is a discriminating statement. Regardless of the intention of this statement, they have a very humiliating effect on other team members.If you notice something like this in someone, then you should point it out to the person publicly or privately. If you can't because you may be too involved, ask your team leader or management to say something.
- Harassment may include but not limited to the following:
- Offensive, inappropriate, or unwanted comments related to gender, sexual orientation, disability, physical appearance, body size, race, ethnicity, national origin, religion, or age, or other protected categories under applicable law.
- Visual harassment eg. sexual imagery or use of sexual language at community events
- Disrespect towards differences of opinion
- Deliberate intimidation, stalking, harassing photography or recording
- Sustained disruption of talks or other events
- Inappropriate or unwanted physical contact
- Intimidation or bullying (online or in-person)
- Unwelcome sexual attention
- Reporting and Enforcement
REPORT A PROBLEM
The worst thing that can happen is someone keeps quiet when there are problems. There are a number of things that you can do to resolve conflicts and problems as best you can:
- Contact the management directly:
because we take incidents regarding the topics mentioned very seriously. We are always there for you to discuss any problem and together we will find out what steps we need to take next to solve the problem. In any case, we will do everything in our power to keep in extensive consultation with all those who report a problem and to maintain confidentiality.
- Talk to your team lead:
because as a team lead you know best about the dynamics of the team. He or she is the best contact to ask for advice. Together you will find out how to resolve the conflict and how to avoid being further affected in your work.
- Speak it out directly:
Minor incidents should be addressed directly. Take your time and talk to the affected team member privately. Use this approach only if you feel comfortable. If you are unsure how to conduct such a conversation, contact the management and you will receive advice on how to conduct the conversation.
REPORTING AND ENFORCEMENT
- If you are the subject of, or witness to any violations of this
Code of Conduct, please contact us by submitting an incident report, or email us. - Project maintainers who do not follow or enforce the Code of Conduct in good faith may face temporary or permanent repercussions as determined by other members of the project's leadership.
- If necessary,Admins are empowered to take appropriate actions that may include, but are not limited to, warnings, expulsion from the conference without refund, and referrals to venue security or local law enforcement.
행동 강령
우리는 인종, 종교, 피부색, 출신 국가, 나이, 장애, 성적 지향, 성 정체성, 부모 여부, 결혼 여부, 정치적 소속뿐만 아니라 성별 표현, 정신 질환, 사회 경제적 지위나 배경에 관계없이 모든 사람을 위한 포용적인 환경을 만들고자 합니다. 우리는 이러한 가치로 단결하며 우리의 독특한 차이점을 존중합니다.
소개
-
우리는 모든 사람에게
괴롭힘 없는경험을 제공하기 위해 최선을 다하며, 어떤 형태로든 참가자에 대한 괴롭힘을 용납하지 않습니다. 다른 사람을 배려하고 모든 다른 참가자에게 전문적이고 존중하는 태도를 보여주시길 바랍니다. -
이 강령과 관련 절차는 커뮤니티 활동 범위를 벗어나 발생하는 용납할 수 없는 행동, 모든 커뮤니티 장소(온라인 및 오프라인), 모든 일대일 커뮤니케이션, 그리고 그러한 행동이 커뮤니티 구성원의 안전과 안녕에 부정적인 영향을 미칠 가능성이 있는 모든 곳에 적용됩니다.
-
관리자, 멘토, 기여자는 이러한 커뮤니티 가이드라인과
행동 강령을 준수해야 합니다. -
다양성과 포용성은 우리를 강하게 만듭니다. 우리는 가능한 한 가장 다양하고 다양한 배경의 참여를 장려하며, 우리의 입장을 매우 명확히 하고자 합니다.
우리의 목표는 경험, 성 정체성 및 표현, 성적 지향, 장애, 개인적인 외모, 신체 크기, 인종, 민족, 나이, 종교, 국적 또는 해당 법률에 따라 보호되는 기타 범주에 관계없이 모든 사람을 위한 안전하고 도움이 되며 친근한 커뮤니티를 유지하는 것입니다.
기대되는 행동
동료를 요청에 따라 지원하는 것뿐만 아니라 적극적으로 행동하십시오. 팀원이 문제로 어려움을 겪고 있거나 다른 도움이 필요한 경우 도움을 제안하십시오. 너무 거들먹거리거나 무례하지 않도록 주의하십시오. 누군가 도움을 청하면 항상 열린 마음으로 듣고 상대방의 입장에서 생각하려고 노력하십시오. 마감일 때문에 시간이 없다면 그 사람에게 알리고 언제 시간이 있는지 솔직하게 말하거나 주제에 대해 똑같이 잘 아는 팀원을 추천해 줄 수도 있습니다.
다른 사람에 대해 사려 깊고 배려심 있게 행동해야 합니다. 이러한 방식으로 우리는 팀이 다음과 같아야 하는 협력적이고 긍정적이며 건강한 환경에 기여합니다.
- 포용적이어야 합니다.
- 협력적이어야 합니다.
- 전문적이어야 합니다.
- 책임감 있어야 합니다.
- 정직해야 합니다.
- 환영해야 합니다.
- 친절해야 합니다.
- 다른 관점과 아이디어를 존중해야 합니다.
- 서로를 지지하고 보살펴야 합니다.
용납할 수 없는 행동
우리는 모든 사람을 위한 환영하고 친근한 기업 문화를 만들고 싶습니다. 차별과 괴롭힘은 명시적으로 금지됩니다. 또한 배타적이거나 괴롭히는 모든 행동이나 언어는 강력히 거부됩니다. 특히 기술 분야에는 우리가 보고 싶지 않고 바꾸고 싶은 행동이 있습니다.
- 팀원이 아직 주제에 익숙하지 않다고 해서 놀라지 마십시오.
우리는 초심자의 정신과 끊임없이 새로운 것을 배우고 싶어 한다는 사실을 믿습니다. "모르겠다" 또는 "이해하지 못했다"고 말하는 것은 절대적으로 괜찮습니다. "어리석은 질문은 없다"는 말은 우리가 100% 실천합니다. 왜냐하면 그것이 우리가 배우는 유일한 방법이기 때문입니다. 그러니 누군가가 도구, 사람 또는 프로세스에 익숙하지 않다고 해서 놀라지 마십시오.
- 배타적인 언어 사용 금지
아무리 진부하게 들릴지라도 단어 선택에 주의하십시오. 아니요, 직장에는 "훌륭한 남자들"만 있는 것이 아니라 "훌륭한 사람들"(모두 포함)이 있습니다. 성차별적, 인종차별적, 거부적, 배타적인 농담은 부적절하며 팀에서 용납되지 않습니다. 어떤 종류의 언어적 괴롭힘이나 왕따도 마찬가지로 강력하게 거부됩니다.
- "아는 체하는" 발언 금지:
누군가가 거의 맞지만 완전히 정확하지는 않은 말을 할 때, 이전에 말한 내용에 수정을 추가하는 경향이 있습니다. 우리는 항상 다른 사람의 체면을 세워주고 우리의 가치를 지키기 위해 노력해야 합니다. 대부분의 경우 이러한 "아는 체하는" 발언은 전체 대화에 결정적이지 않으며 목표 지향적이지 않고 오히려 성가시고 시간 낭비입니다. 당신의 눈에 그것이 중요하다면, 다른 사람들이 당신이 틀렸거나 문맥에서 중요한 것을 놓쳤을 수 있다는 인상을 남기는 언어를 사용하여 지금 다른 견해를 취하십시오.
- 미묘한 발언 금지:
배타적인 행동은 종종 미묘한 발언으로 특징지어집니다. "내 딸도 할 수 있을 만큼 쉽다"고 말하는 것은 차별적인 발언입니다. 이 발언의 의도와 상관없이 다른 팀원들에게 매우 굴욕적인 영향을 미칩니다. 누군가에게서 이런 것을 발견하면 공개적으로 또는 개인적으로 그 사람에게 지적해야 합니다. 너무 관여되어 있어서 할 수 없다면 팀 리더나 경영진에게 무언가 말해달라고 요청하십시오.
- 괴롭힘에는 다음이 포함될 수 있지만 이에 국한되지는 않습니다.
- 성별, 성적 지향, 장애, 신체적 외모, 신체 크기, 인종, 민족, 출신 국가, 종교 또는 나이 또는 해당 법률에 따라 보호되는 기타 범주와 관련된 공격적이거나 부적절하거나 원치 않는 발언.
- 시각적 괴롭힘(예: 커뮤니티 행사에서 성적인 이미지 또는 성적인 언어 사용)
- 의견 차이에 대한 무례함
- 고의적인 위협, 스토킹, 괴롭힘 목적의 사진 촬영 또는 녹음
- 강연 또는 기타 행사의 지속적인 방해
- 부적절하거나 원치 않는 신체 접촉
- 위협 또는 왕따(온라인 또는 직접)
- 원치 않는 성적 관심
- 보고 및 집행
문제 신고
문제가 있을 때 누군가 침묵을 지키는 것이 최악의 상황입니다. 갈등과 문제를 최대한 해결하기 위해 할 수 있는 몇 가지 방법이 있습니다.
- 경영진에 직접 연락하십시오:
언급된 주제에 관한 사건을 매우 심각하게 받아들이기 때문입니다. 우리는 항상 어떤 문제에 대해 논의하기 위해 여러분을 위해 있으며, 함께 문제를 해결하기 위해 다음에 어떤 조치를 취해야 할지 알아낼 것입니다. 어떤 경우든, 우리는 문제를 보고하는 모든 사람들과 광범위하게 협의하고 기밀을 유지하기 위해 최선을 다할 것입니다.
- 팀 리더와 이야기하십시오:
팀 리더로서 팀의 역학에 대해 가장 잘 알고 있기 때문입니다. 조언을 구하기에 가장 좋은 연락처입니다. 함께 갈등을 해결하는 방법과 업무에 더 이상 영향을 받지 않는 방법을 알아낼 것입니다.
- 직접 이야기하십시오:
사소한 사건은 직접 해결해야 합니다. 시간을 내어 해당 팀원과 개인적으로 이야기하십시오. 이 방법은 편안하게 느껴질 때만 사용하십시오. 그러한 대화를 어떻게 진행해야 할지 확신이 서지 않으면 경영진에게 연락하여 대화 진행 방법에 대한 조언을 받으십시오.
보고 및 집행
- 이
행동 강령위반의 대상이 되거나 목격한 경우, 사건 보고서를 제출하거나 이메일로 문의하십시오. - 선의로 행동 강령을 따르거나 시행하지 않는 프로젝트 관리자는 프로젝트 리더십의 다른 구성원이 결정한 대로 일시적 또는 영구적인 불이익을 받을 수 있습니다.
- 필요한 경우 관리자는 경고, 환불 없는 회의 퇴장, 장소 보안 또는 지역 법 집행 기관에 대한 의뢰를 포함하되 이에 국한되지 않는 적절한 조치를 취할 권한이 있습니다.
MIT License
Copyright (c) 2020 Awesome-Python-Projects
Permission is hereby granted, free of charge, to any person obtaining a copy of this software and associated documentation files (the "Software"), to deal in the Software without restriction, including without limitation the rights to use, copy, modify, merge, publish, distribute, sublicense, and/or sell copies of the Software, and to permit persons to whom the Software is furnished to do so, subject to the following conditions:
The above copyright notice and this permission notice shall be included in all copies or substantial portions of the Software.
THE SOFTWARE IS PROVIDED "AS IS", WITHOUT WARRANTY OF ANY KIND, EXPRESS OR IMPLIED, INCLUDING BUT NOT LIMITED TO THE WARRANTIES OF MERCHANTABILITY, FITNESS FOR A PARTICULAR PURPOSE AND NONINFRINGEMENT. IN NO EVENT SHALL THE AUTHORS OR COPYRIGHT HOLDERS BE LIABLE FOR ANY CLAIM, DAMAGES OR OTHER LIABILITY, WHETHER IN AN ACTION OF CONTRACT, TORT OR OTHERWISE, ARISING FROM, OUT OF OR IN CONNECTION WITH THE SOFTWARE OR THE USE OR OTHER DEALINGS IN THE SOFTWARE.